Obtaining Super Mario Bros. and The Legend of Zelda NES Games in Animal Crossing via e-Reader Dot Codes
History

In the original Animal Crossing for the GameCube there are special furniture items that feature fully functional NES games that you can play in your house. Most of these items are obtainable through normal means in the game, such as buying them from Nook’s or finding them in a villager’s buried treasure game. However, there are four specific NES items that are not obtainable through normal means. Dubbed “the forbidden four,” these games are Ice Climber, Mario Bros., Super Mario Bros, and The Legend of Zelda. These items do not appear in any shop, raffle, or event in the game and are specifically blacklisted from being obtained via Tom Nook’s secret codes. Even though we can theoretically generate secret codes to obtain these items, entering the codes does not work due to this blacklist. However, on May 12th, 2003, Nintendo released Series 4 of the e-Reader card packs and made two of these games obtainable by scanning two specific cards at the Post Office via the e-Reader peripheral and a linked Gameboy Advance. These cards were N01 Ice Climber and N02 Mario Bros. and are the only ways possible to obtain these items legitimately in-game.
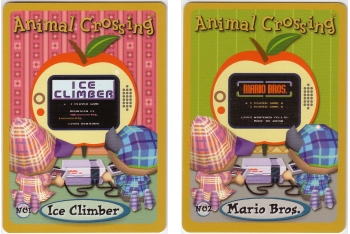 N01 Ice Climber & N02 Mario Bros. e-Reader cards
Since Nintendo released these two cards, it was thought they would release the other cards to unlock Super Mario Bros and The Legend of Zelda. However, due to the commercial failure of the e-Reader in North America, these cards were never printed. Due to this, it’s long been theorized that a certain e-Reader dot code must possibly exist to scan in-game and finally get these items, even if Nintendo never printed them. Many have tried to replicate the Mario Bros. and Ice Climber cards, but to my knowledge, this has never been achieved on console. until now. Over 20 years after the games release and after some painstaking reverse-engineering, I have created working e-Reader dot code cards that can be printed and scanned in-game to give you both items legitimately for the first time. This can be done on a vanilla console with no hacks and no action replay for the very first time – simply print the card using a printer and scan using a North American e-Reader.
Explanation
This is possible by taking the existing Animal Crossing e-Reader cards, extracting their dot code data, and modifying certain flags to create a new dot code with new data. More specifically, I decompiled existing e-Reader card data as a base, made modifications to the data, and recompiled it replicating Nintendo’s (more specifically HAL’s) compression methods to make a new working card. This took quite a bit of research and time to accomplish, especially since e-Reader documentation and development is extremely dated. That said, I hope to detail and document my process further for any future developers interested in toying with the e-Reader or dot codes.
Technical Details
All e-Reader cards start as .raw files that can then be converted into .bin files for viewing in a hex editor. As a .bin file, the Animal Crossing cards that can be scanned in the Post Office are split into three chunks – one containing header data, one containing .vpk data for the Gameboy Advance, and one containing .vpk data for the GameCube.
The header data contains general information and checksums, including the dot code size, the size of the GBA VPK data, etc. Below is a graphic detailing the header data in a hex editor.
 Example e-Reader header data
When modifying e-Reader cards, this header is crucial to keep consistent. If the strip size, region, general size, VPK size, or any of the checksums are incorrect then the card will give a ‘READ ERROR’. We will revisit this when going over how I actually modified the cards.
The next chunk in these cards contains VPK data specifically for the Gameboy Advance; that is, this data gets read by the GBA when you simply scan the card in the e-Reader BIOS (not in the Animal Crossing e-Reader application you download from the GameCube). Most Animal Crossing e-Reader cards have this data to include a letter that shows up on the GBA when scanned, accompanied by a special background and character music.
This data is not actually important when modifying the cards to get in-game items for Animal Crossing, but it is required to be there for the card to function. However, the text that appears on these cards is fully editable in a hex editor once you decompile the VPK, letting you write custom letters that appear on the GBA if interested. I have not tested this extensively, but there appears to be a 256 character (in bytes) limit to this text. Going past this amount is not recommended. There is also data within the VPK that controls the graphics, background, and music that play during this letter screen, but changing those is more complicated than it’s worth.
The important part of the GBA VPK data comes from the padding that occurs after the initial VPK data, but before the start of the GameCube VPK data. This data controls the “letter item” data that you receive in the mail when you scan the card in Animal Crossing. For the sake of receiving NES games as a present in the letter, this letter data must remain the exact same. In the example below you can see the letter is programmed to be from Tom Nook.
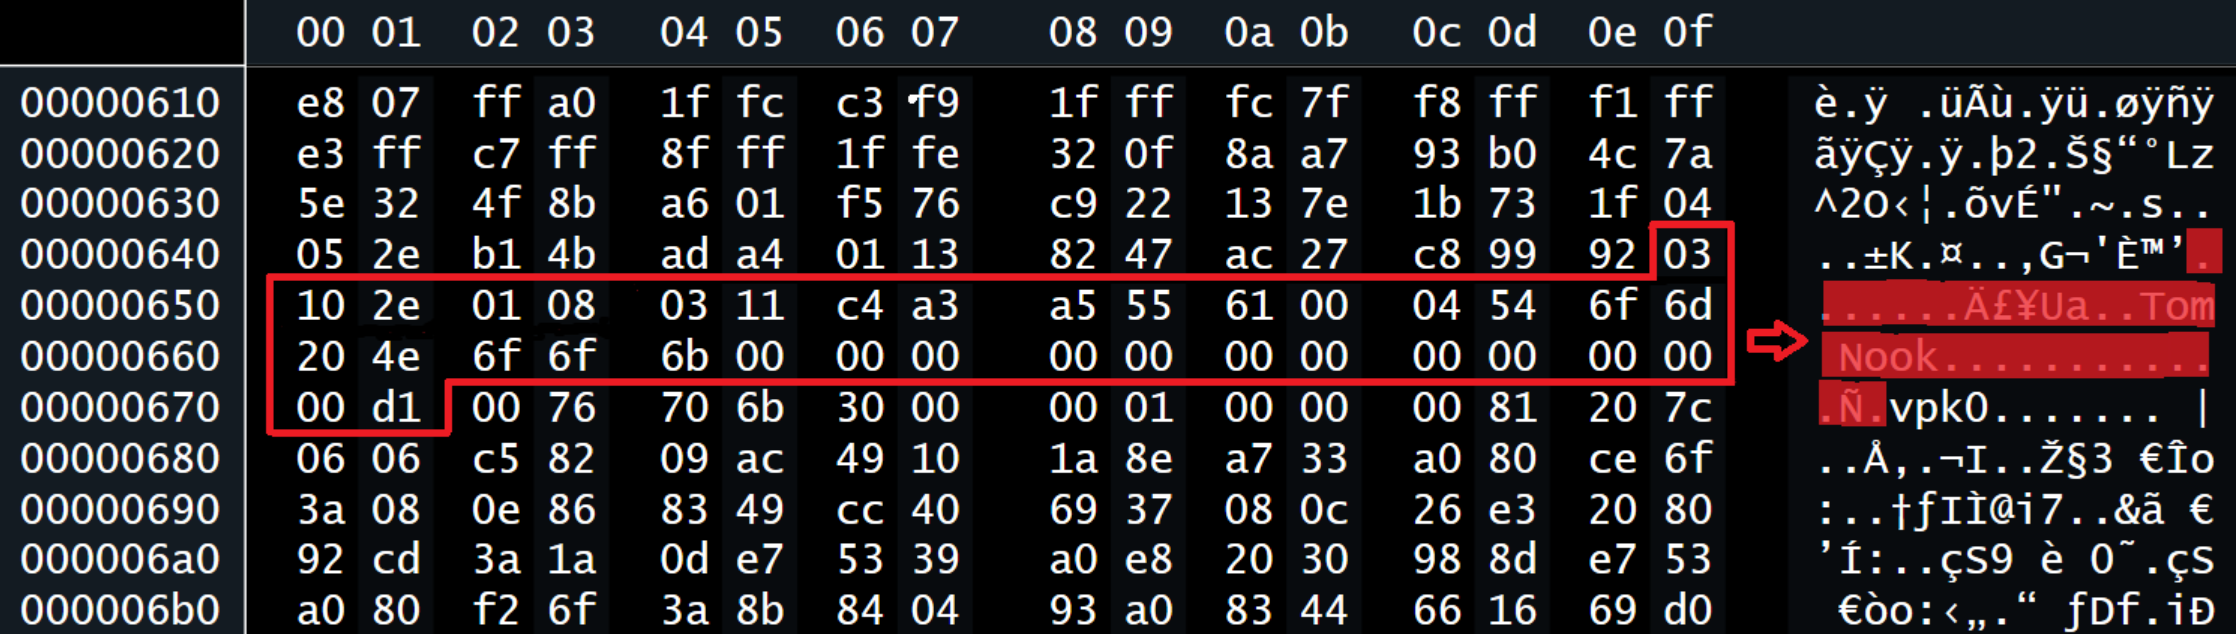 Example letter item data from the Mario Bros. Series 4 e-Reader card
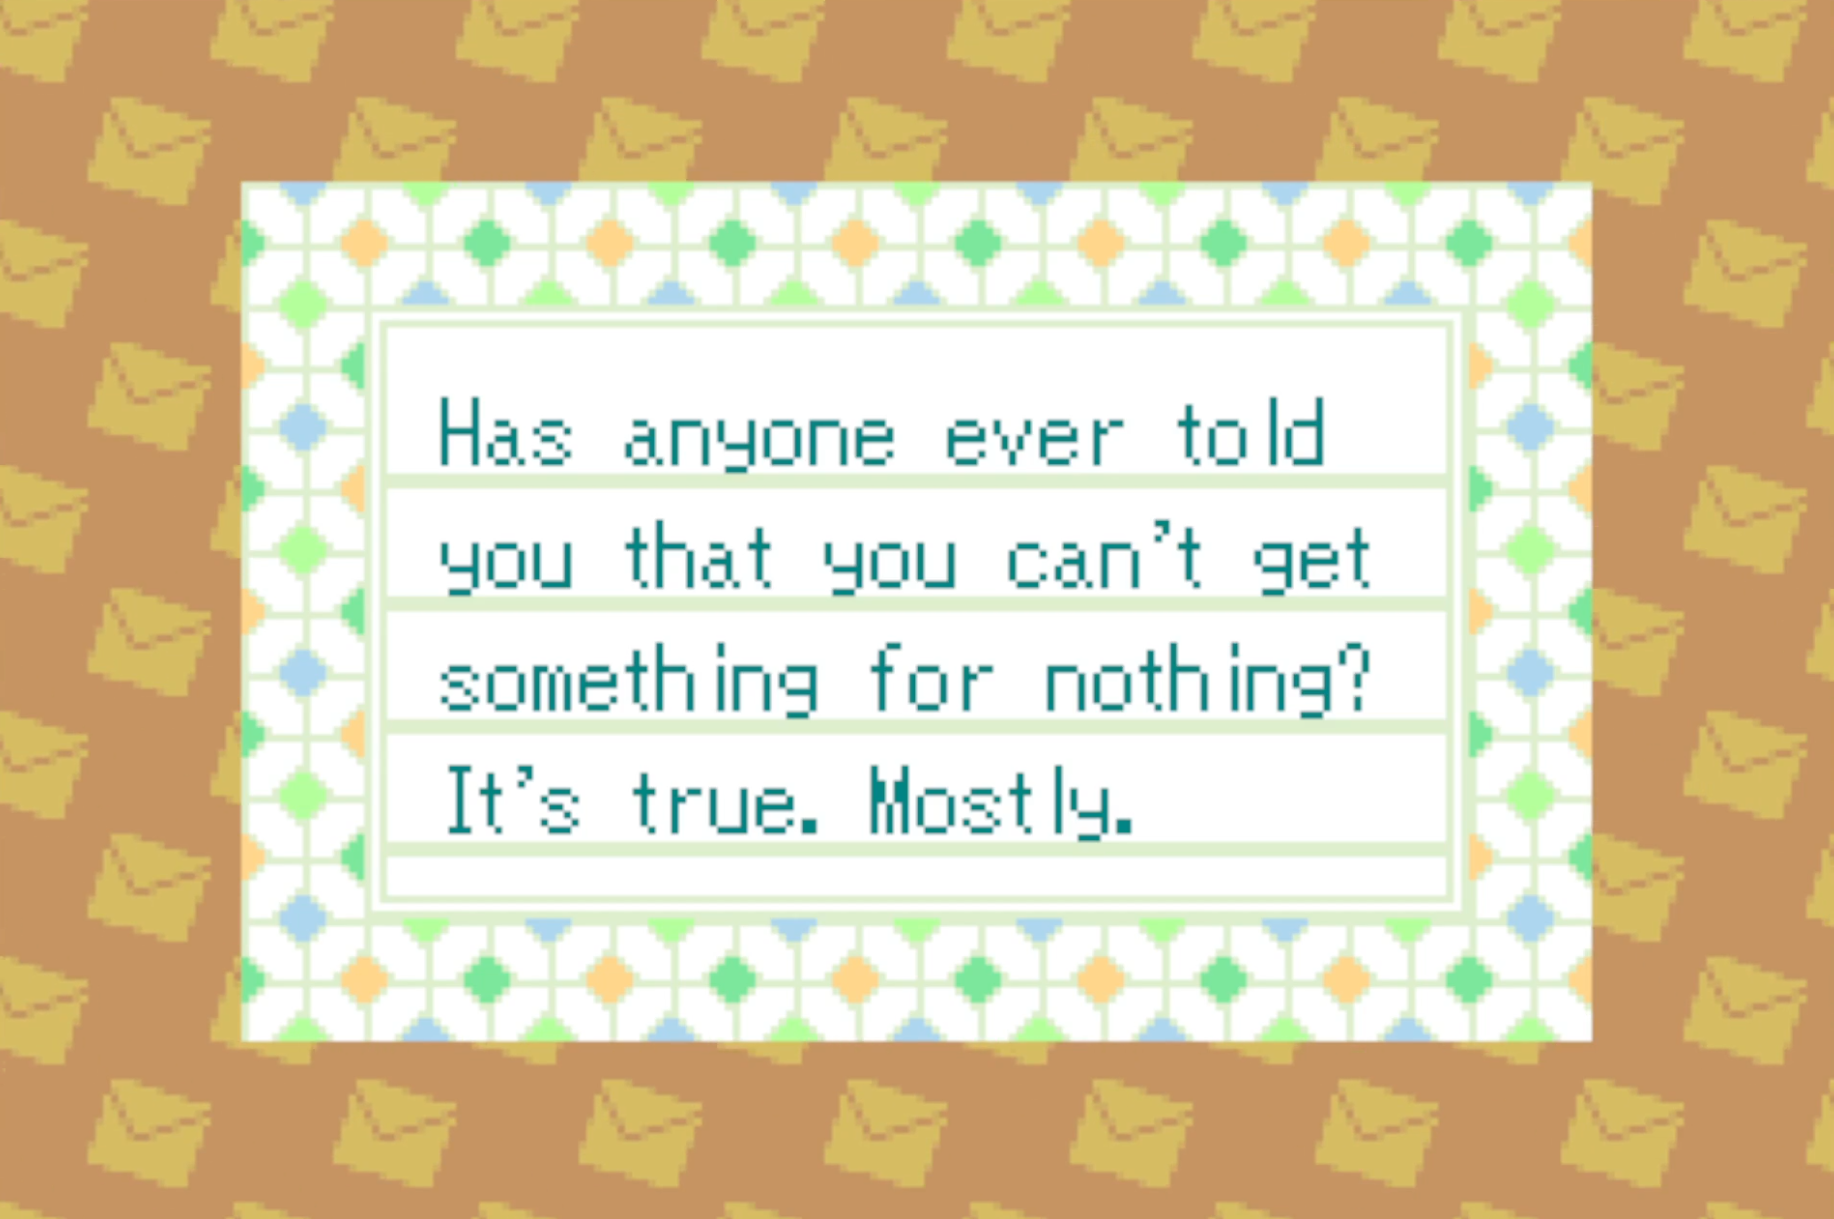
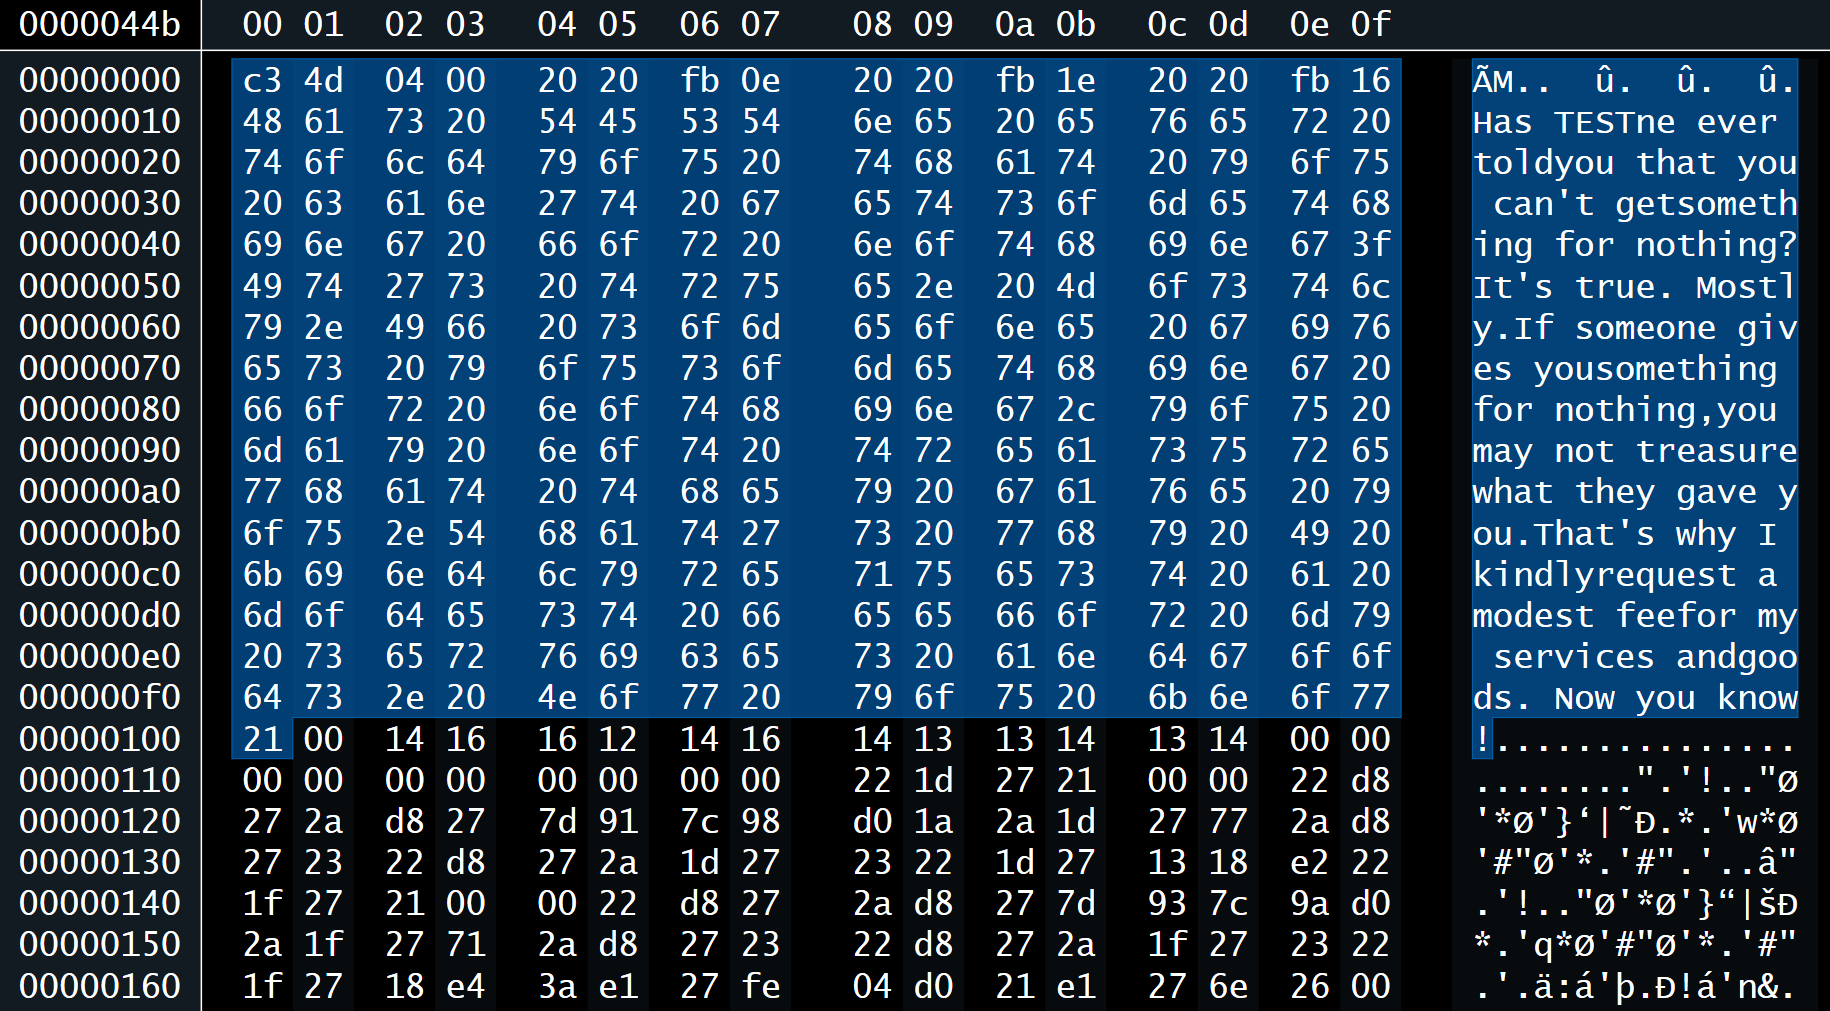
The final chunk of data is the GameCube VPK data. Different from the letter item data, this data controls the letter contents (what is actually written in the letter) as well as what item present is attached. Both of these are editable – so you can receive a letter with customized text as well as most items as an attached present. These must remain within the constraints of the game, however, so no going beyond the letter text limit and no attaching items that cannot normally be attached to letters.
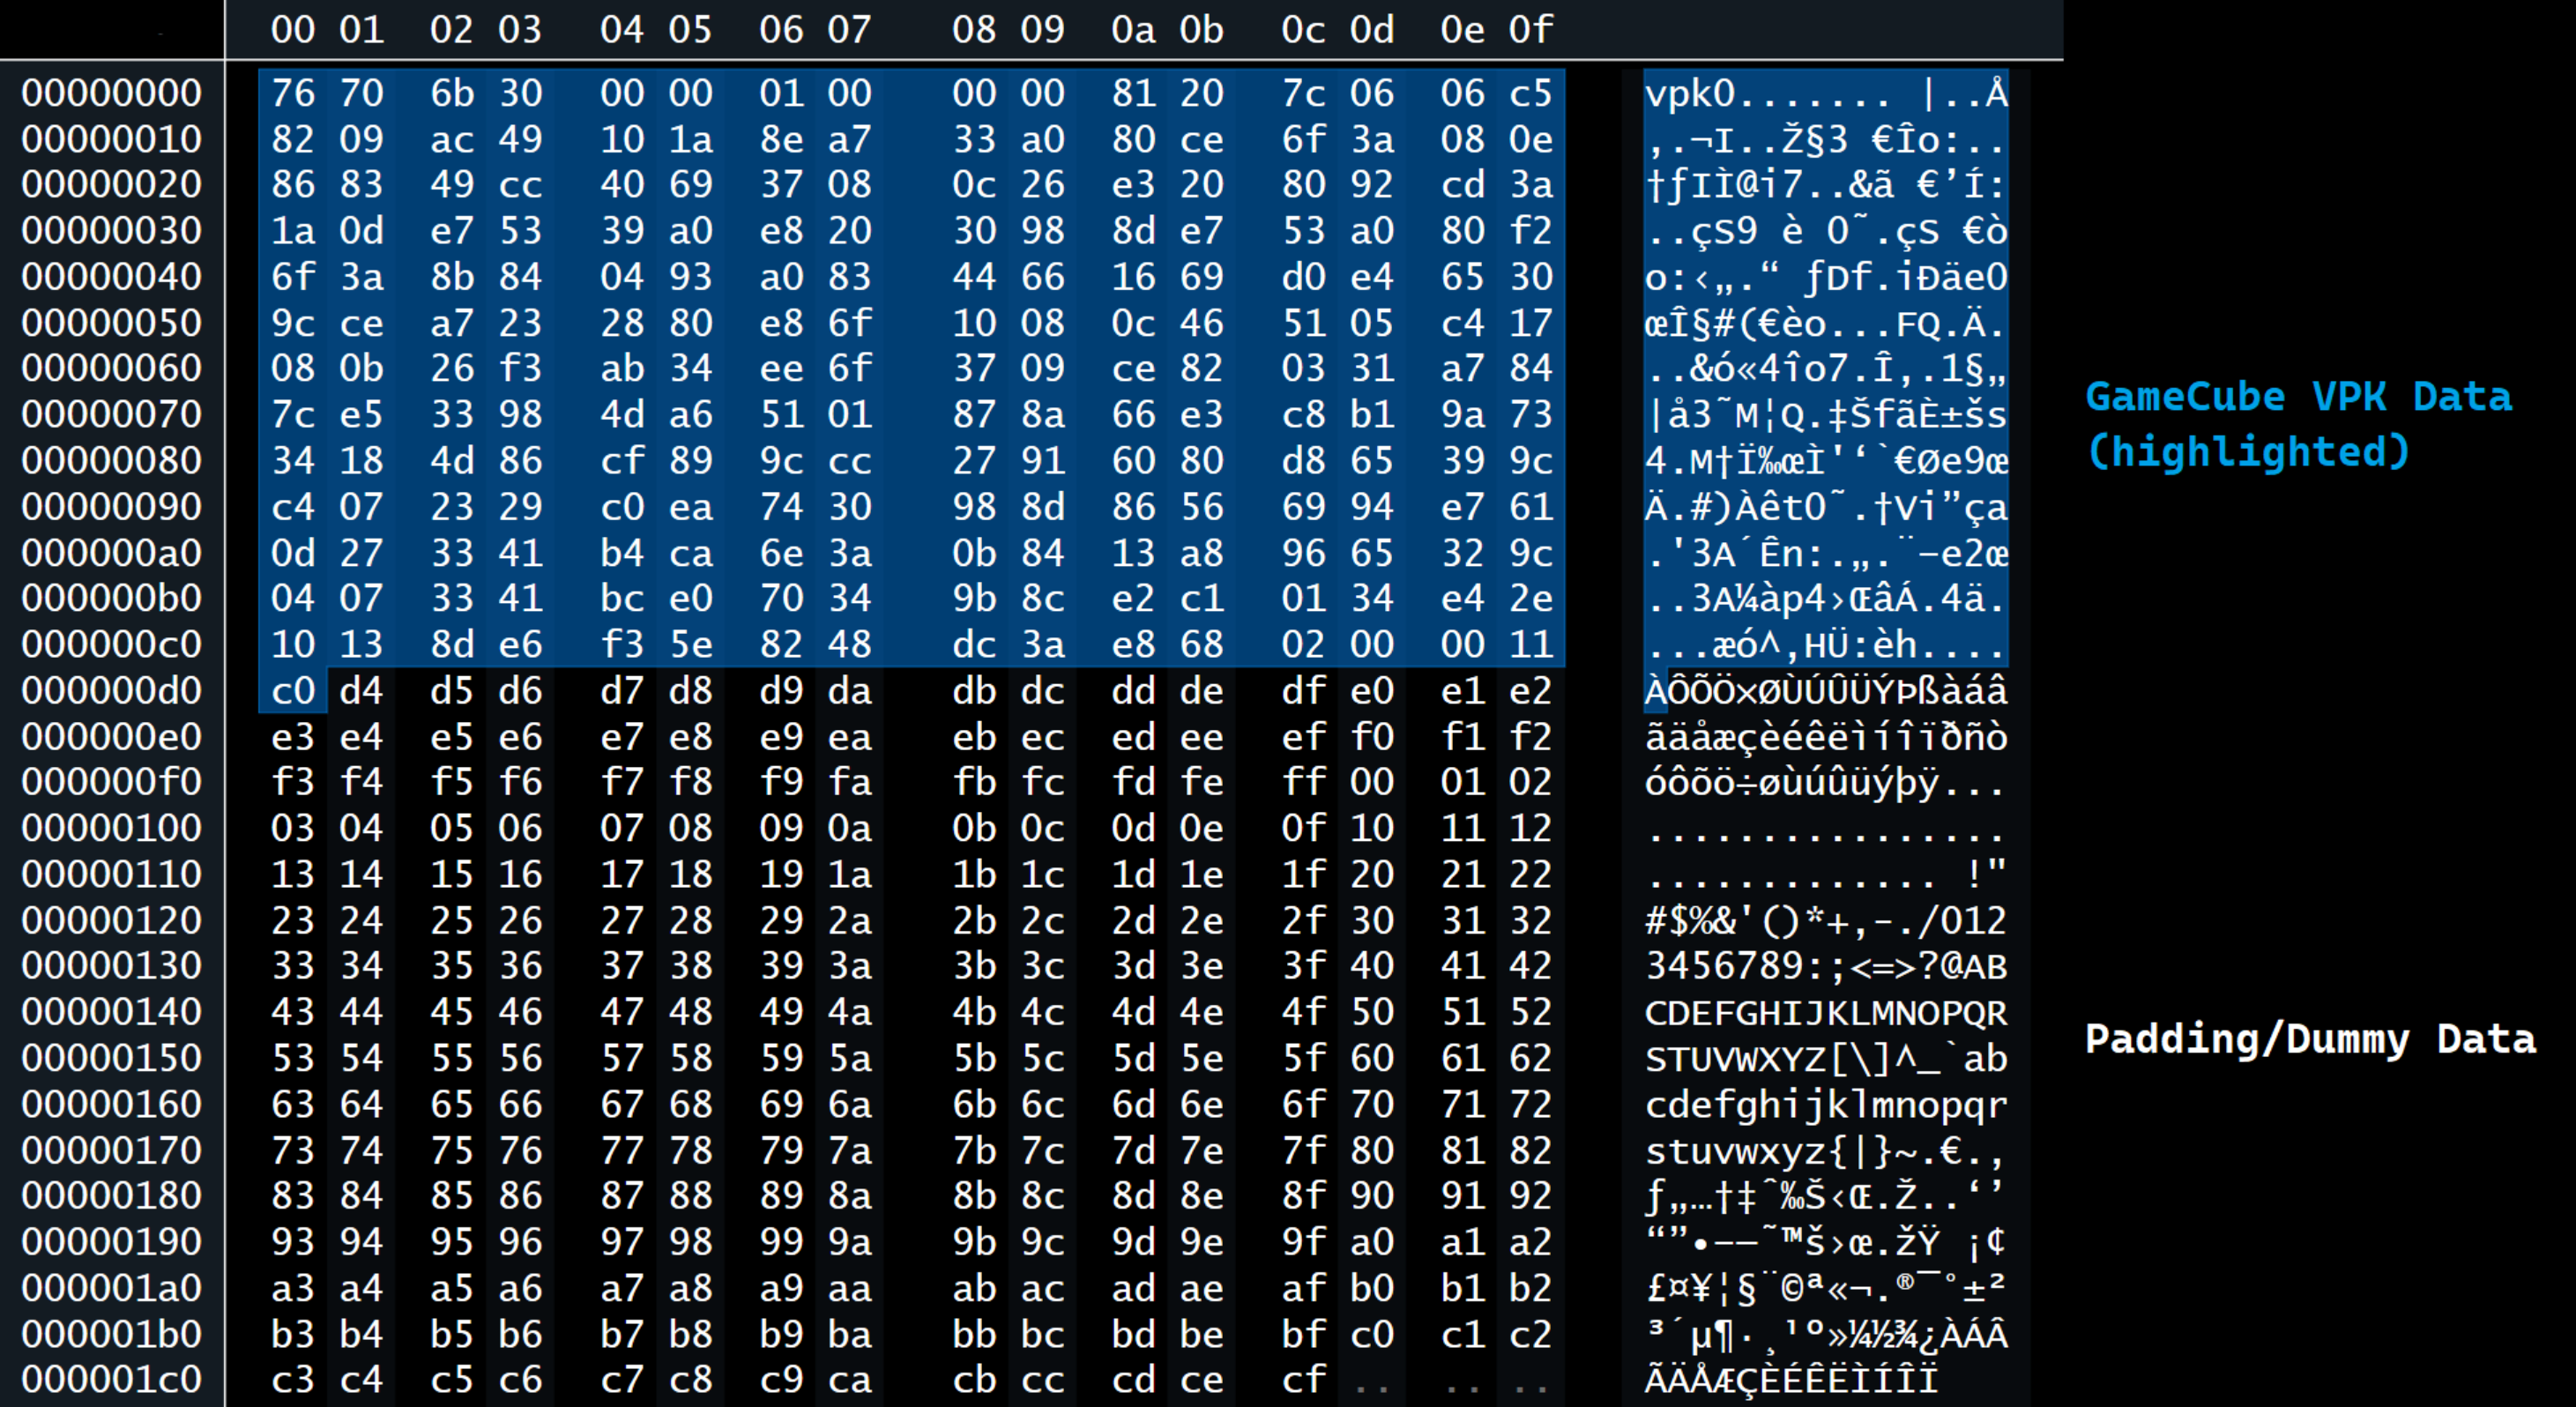 GameCube VPK data from the Mario Bros. Series 4 e-Reader card
Process
For a tutorial on how to actually modify Animal Crossing e-Reader card data, see my guide here.
Obtaining Animal Crossing e-Reader cards in RAW format is quite simple following a few Google searches. However, it is a lot more difficult than simply opening those files and changing item code data. e-Reader cards come in a compressed state, meaning their data is mostly gibberish to the human eye unless we decompile them. Luckily, two people named CaitSith and Tim Schuerewegen took an interest in decompiling the e-Reader from 2004 to 2007. They created various tools that decompile/recompile e-Reader card data that allows them to be read and modified by eye. Their work and programs are published on CaitSith’s site which is still live today. I cannot understate the importance of these programs – they laid the foundation of this discovery nearly 20 years later, so huge props to them. Further, custom Python code created by GameFAQs user RollingStar/do_0m was also instrumental in automating the decompiling process. While this code was unfinished, I was able to write further code and patch a few bugs to complete their original intention.
With these programs in hand, I was able to decompile the e-Reader cards from RAW to BIN to VPK and finally down to its bare source file. In these source files you can actually read the data in a hex editor and make modifications, so I was off to the races figuring out where I could make changes.
 Decompiled GBA VPK from Ice Climber Series 4 card with editable text that can be read and modified by hand
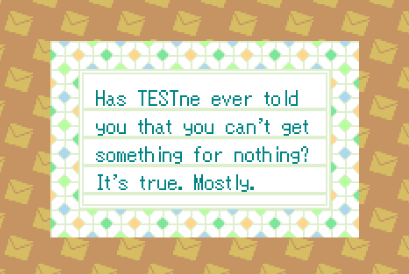
As you can see from this decompiled VPK, you can actually read and edit the bytes manually to change their data. In the above example, I inserted a random “TEST” text into the code and was eventually able to replicate the text in the GBA e-Reader.
However, as mentioned, the process is not as simple as just modifying the data and recompiling. The tools used were great at decompiling data, but were actually too efficient at recompiling data. If you recall, the header data in each e-Reader card have “general size” and “VPK size” flags that must be correct in order for the card to not give an error. That means any change in VPK size or card size must be accounted for in the header. Thus, if the recompiler is too efficient at compressing the data and it becomes a different size than the original, the card will not work. This is usually always the case since the tools used always resulted in a recompiled card that was smaller in size than originally started with. The e-Reader was developed in collaboration between Nintendo, Creatures, and HAL Laboratories, but it’s thought the compression techniques for the peripheral were developed by HAL directly. This is because the vpk0 compression format present in the e-Reader cards are also present in several HAL N64 games, including Super Smash Bros. We do know that HAL used two encoding algorithms in their vpk0 compression: LSZZ and Huffman Encoding. However, we do not know the exact settings they used for the e-Reader so I had to find a workaround in order to replicate their compression process.
This meant I needed to modify the header data to accurately flag the VPK size and the general size of the card.
Revisiting this diagram, the VPK size is denoted by the final two bytes of the header data. Note that these are written in little endian, so the VPK size here is 0x05DB in hexadecimal or 1499 bytes in decimal. Thus, when recompiling a new VPK I had to make note of the size and change this value to the proper hexadecimal declaring the new size of the VPK. If this value is off by a single digit, the card will not read. Further, there is also a general size info which also keeps track of VPK size. In green, the hexadecimal 0x020BBA22 is actually 32-bits of information written in binary, with bits 9-23 repeating the VPK size plus an additional 2 bytes for where the size is declared. With this information we can do some bit math to properly rewrite the size info flag to accurately represent newly recompressed data.
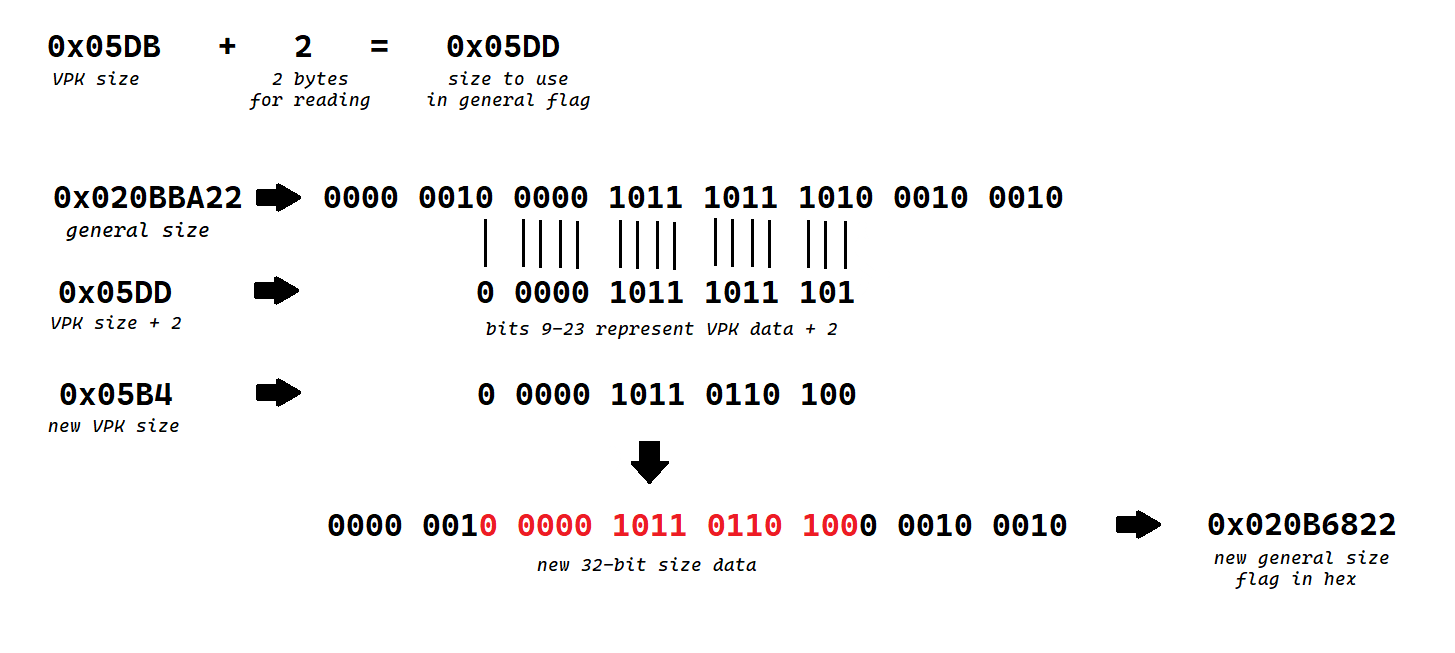 Example of the hex/bit math required to recreate the general size flag in the data header
Using this formula, I was able to recreate the general size flag within the header data to accurately represent any newly compressed data I introduced into the code. There is still a problem however, as there is a global check to ensure that the total size of the e-Reader card data is 2112 bytes. Since the compression brings us below this limit, we simply fill the data with 00 or ff as blank “padding” data to ensure the card size is correct. On top of this, there are still two checksum flags in the header that need to be corrected. Mathematically, these checksums are the complement of the sum of all halfwords in all data fragments. This can be done manually, but luckily user BlackShark from Project Pokémon created a program to correct these checksums automatically. This was originally created for use with the Pokémon e-Reader cards, but luckily this code can also be repurposed here. Big thanks to BlackShark for also posting about the above math and formulas which made the process easier.
With all of these programs and complications settled, we can now successfully decompile and recompile e-Reader data accurately. So I decompiled one of the Animal Crossing e-Reader cards, rewrote the bytes responsible for generating the item attached to the letter to include the Super Mario Bros item code, and recompiled through the process above. From this, I was able to generate a working RAW file that was properly scanned in Dolphin emulator and gave me a working Super Mario Bros furniture item in-game. From here, it was time to generate and print a physical dot code based off this RAW file and test on console.
Printing the Dot Codes
To actually print the dot codes physically, you will need access to a modern printer with at least 600x600dpi printing resolution and high quality glossy photo paper. Converting the RAW files into printable dot codes can be challenging, but luckily Tim Schuerewegen developed a tool to easily print them back in 2004 that still works today. You can get the e-Reader dot code printing tool from CaitSith’s site here. Most modern inkjet/laser printers are capable of printing accurate dot codes, but this may be trial-and-error depending on the type of printer you have. Following this video tutorial may also prove helpful.
Here are my Canon TR4722 printer settings for reference: 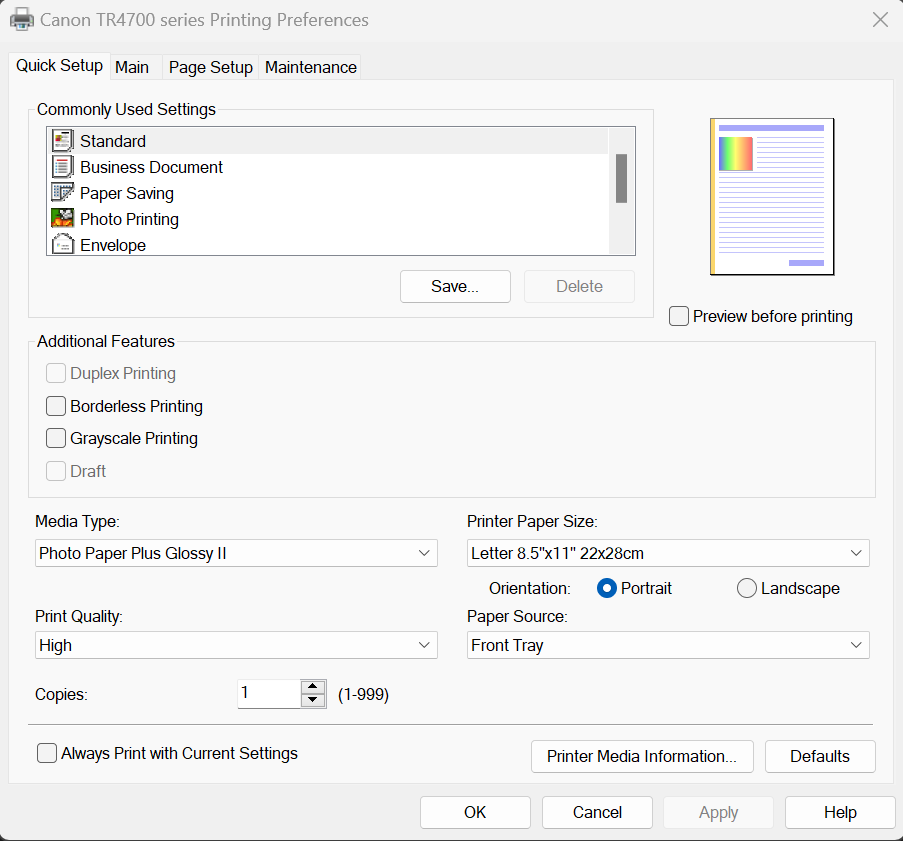
Testing on Console
See the video below for testing and proving this is possible on a vanilla console.
Downloads
You can download the files for the Super Mario Bros e-Reader card here:
You can download the files for The Legend of Zelda e-Reader card here:
Acknowledgements
This project could not have been accomplished by myself, and I’d like to thank several people for posting their findings on the internet for me to use as research:
- CaitSith2 and Tim Schuerewegen for developing and compiling the e-Reader dev tools from 2004-2007.
- RollingStar (GitHub) / do_0m (GameFAQs) for starting the Python project of automating the decompilation/recompilation process.
- BlackShark for shedding light on e-Reader header data and creating the program to automatically fix header checksums.
- Martin Korth for documenting extracted e-Reader development information and publishing them on his site.
- tehzz for shedding light on the vpk0 compression format and its history.
- Anzomia for creating the YouTube tutorial on how to print dot codes, sparking my interest in the project.
References
Below are several links I used as research to make this project possible:
- https://www.caitsith2.com/ereader/index.htm
- https://crates.io/crates/vpk0
- https://problemkaputt.de/gbatek-gba-cart-e-reader-data-format.htm
- https://problemkaputt.de/gbatek-gba-cart-e-reader-program-code.htm
- https://projectpokemon.org/home/forums/topic/58692-tutorial-creating-custom-trainerberry-e-cards/
- https://web.archive.org/web/20191102214417/http://users.skynet.be/firefly/gba/e-reader/