Replicating Nintendo's Ice Climber Controller Pak for Doubutsu no Mori (N64)
This post provides additional technical information to accompany a dedicated video on this topic.
Background
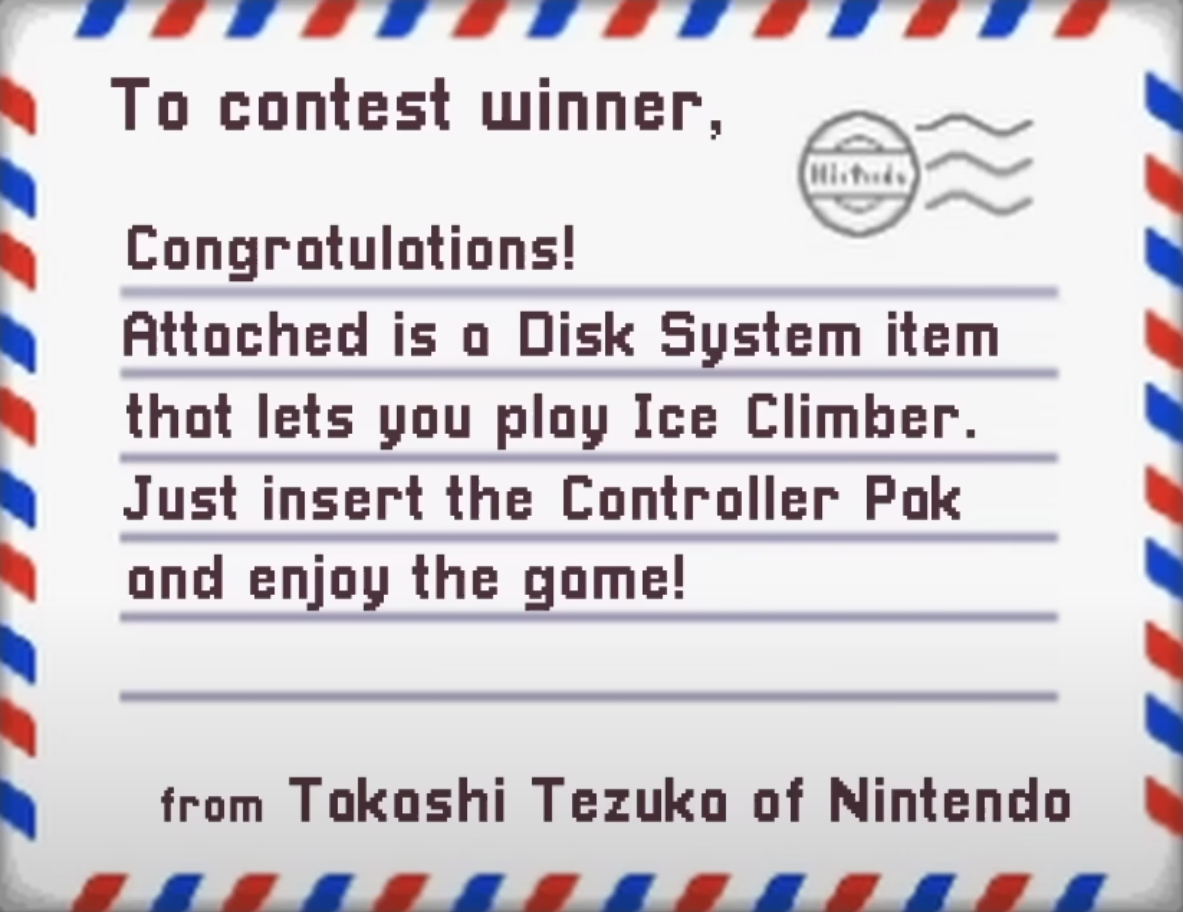
Back in 2001, Nintendo held Japanese-exclusive magazine promotions through Famitsu and Nintendo Dream. Readers could enter a special giveaway by mailing in a letter with their thoughts about Doubutsu no Mori, the original Japanese N64 version of Animal Crossing. To our knowledge, sixty lucky winners were chosen amongst these entries and their prize was an extremely rare N64 Controller Pak with the Famicom ROM of Ice Climber formatted on it. By plugging in this Pak to your N64 Controller and interacting with a “Disk System” furniture item in Doubutsu no Mori, the game would search the Controller Pak for Famicom ROM data and boot up the full game of Ice Climber inside the included emulator. According to a few magazines, this Controller Pak also came with a digital letter from Takashi Tezuka, the producer of Doubutsu no Mori, which you could find via the in-game post office mailbox.
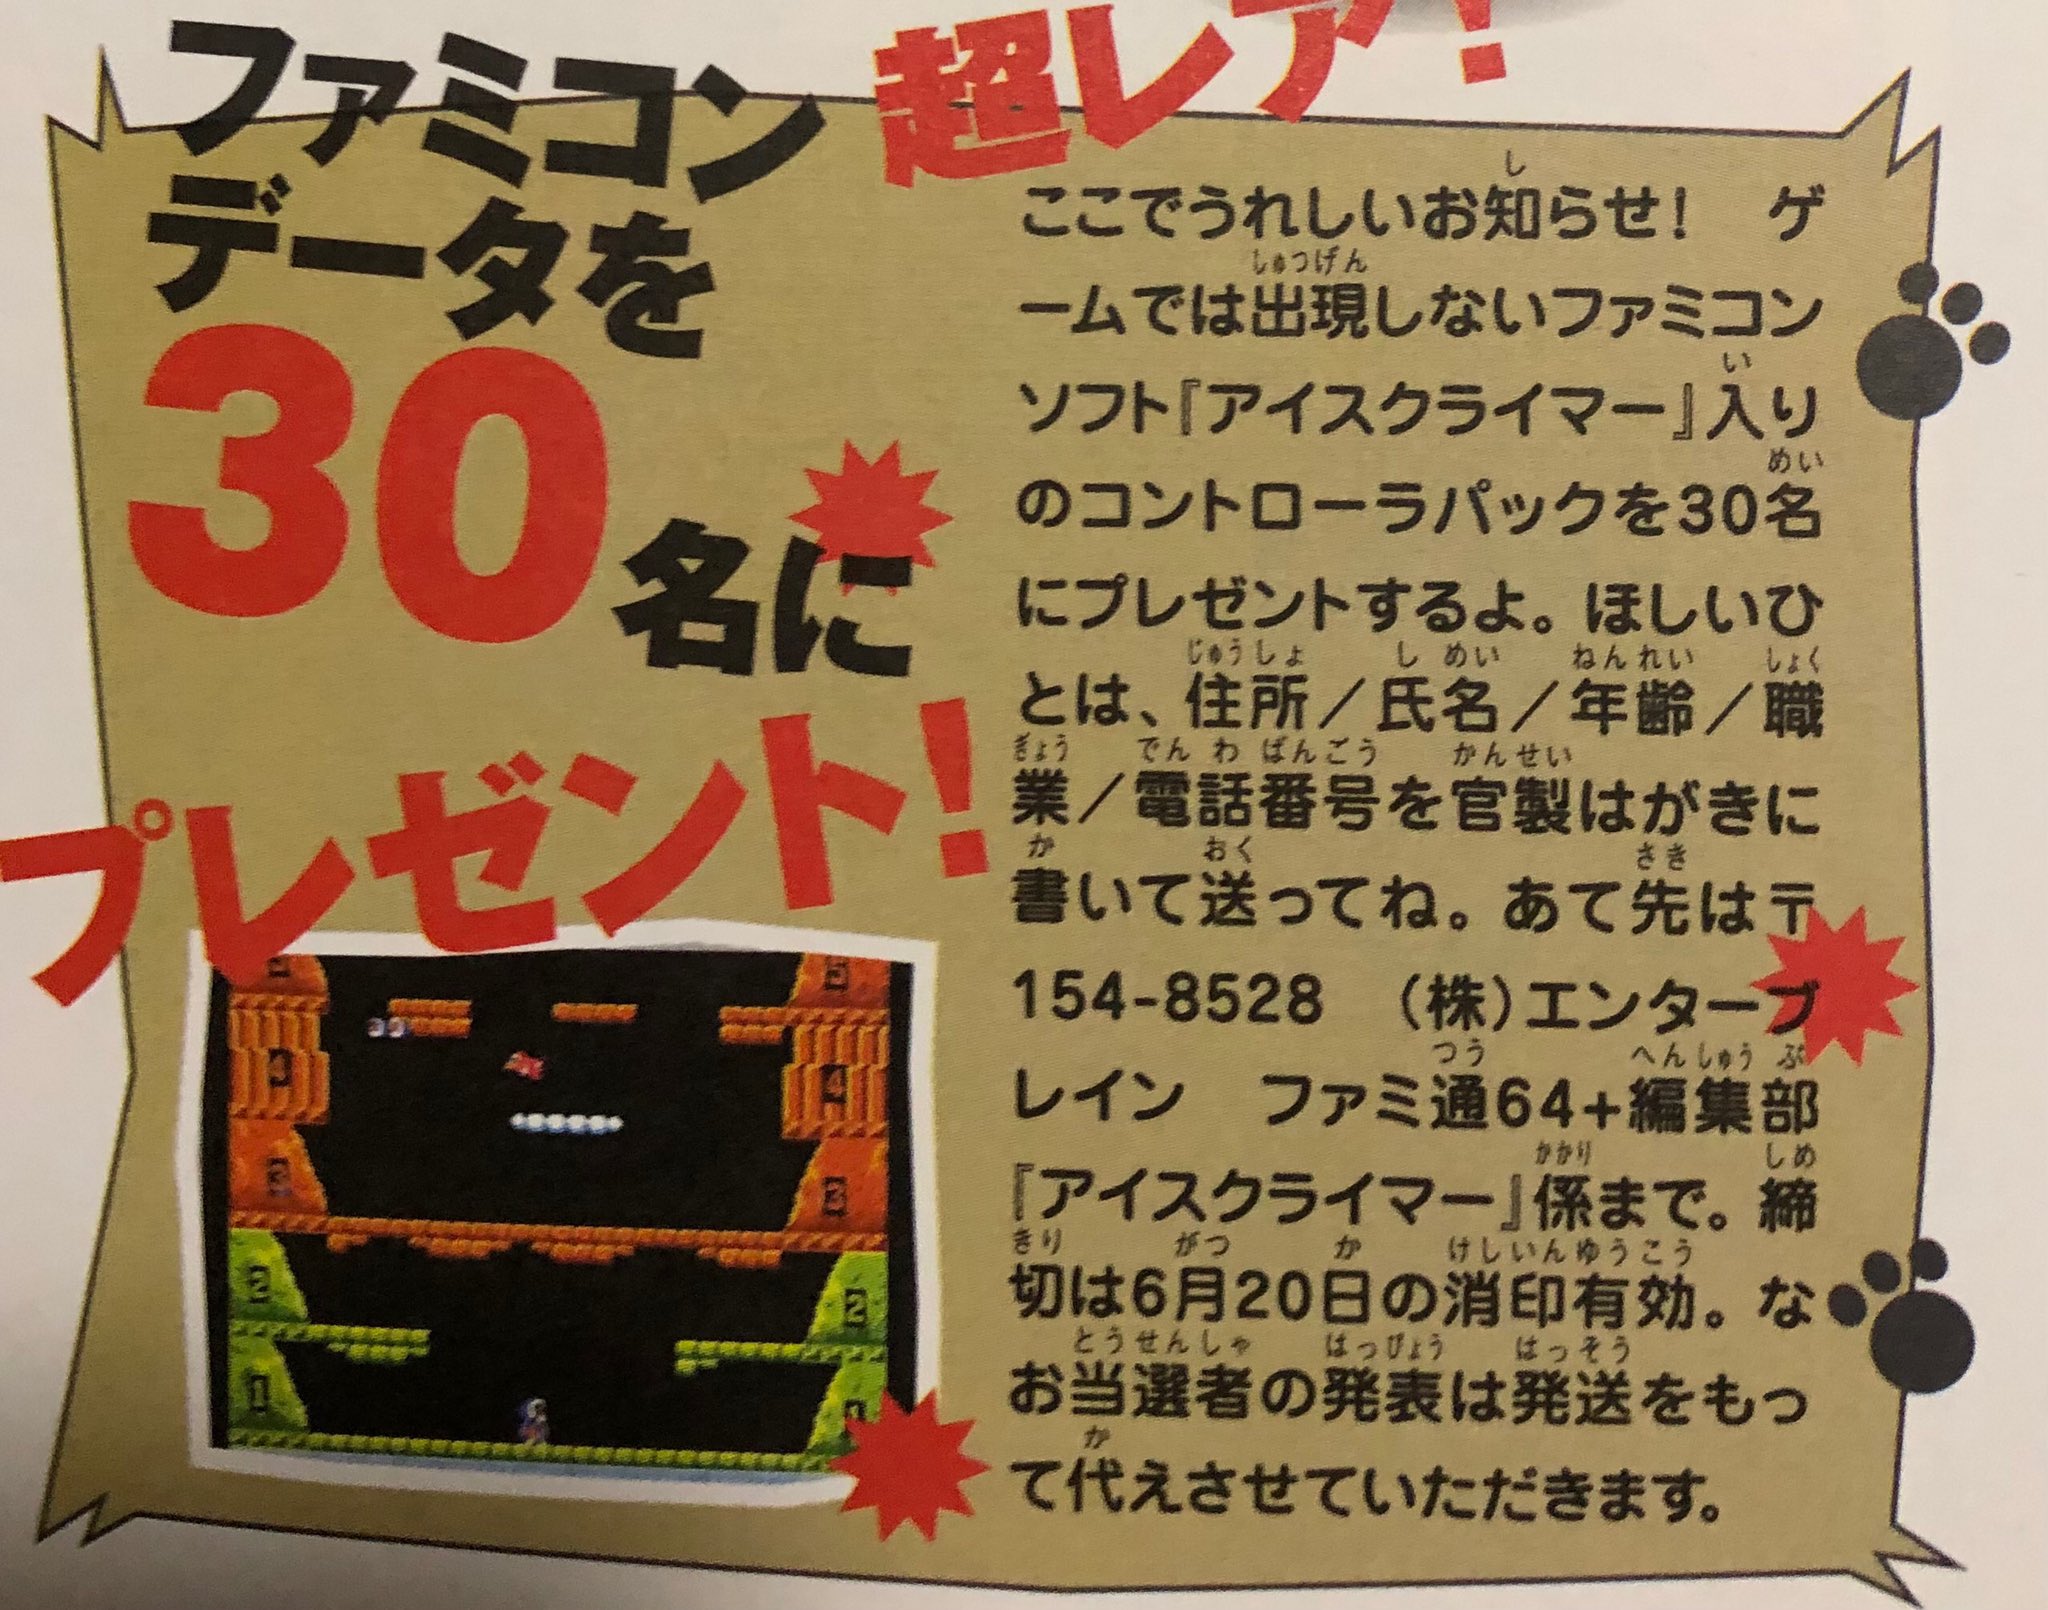
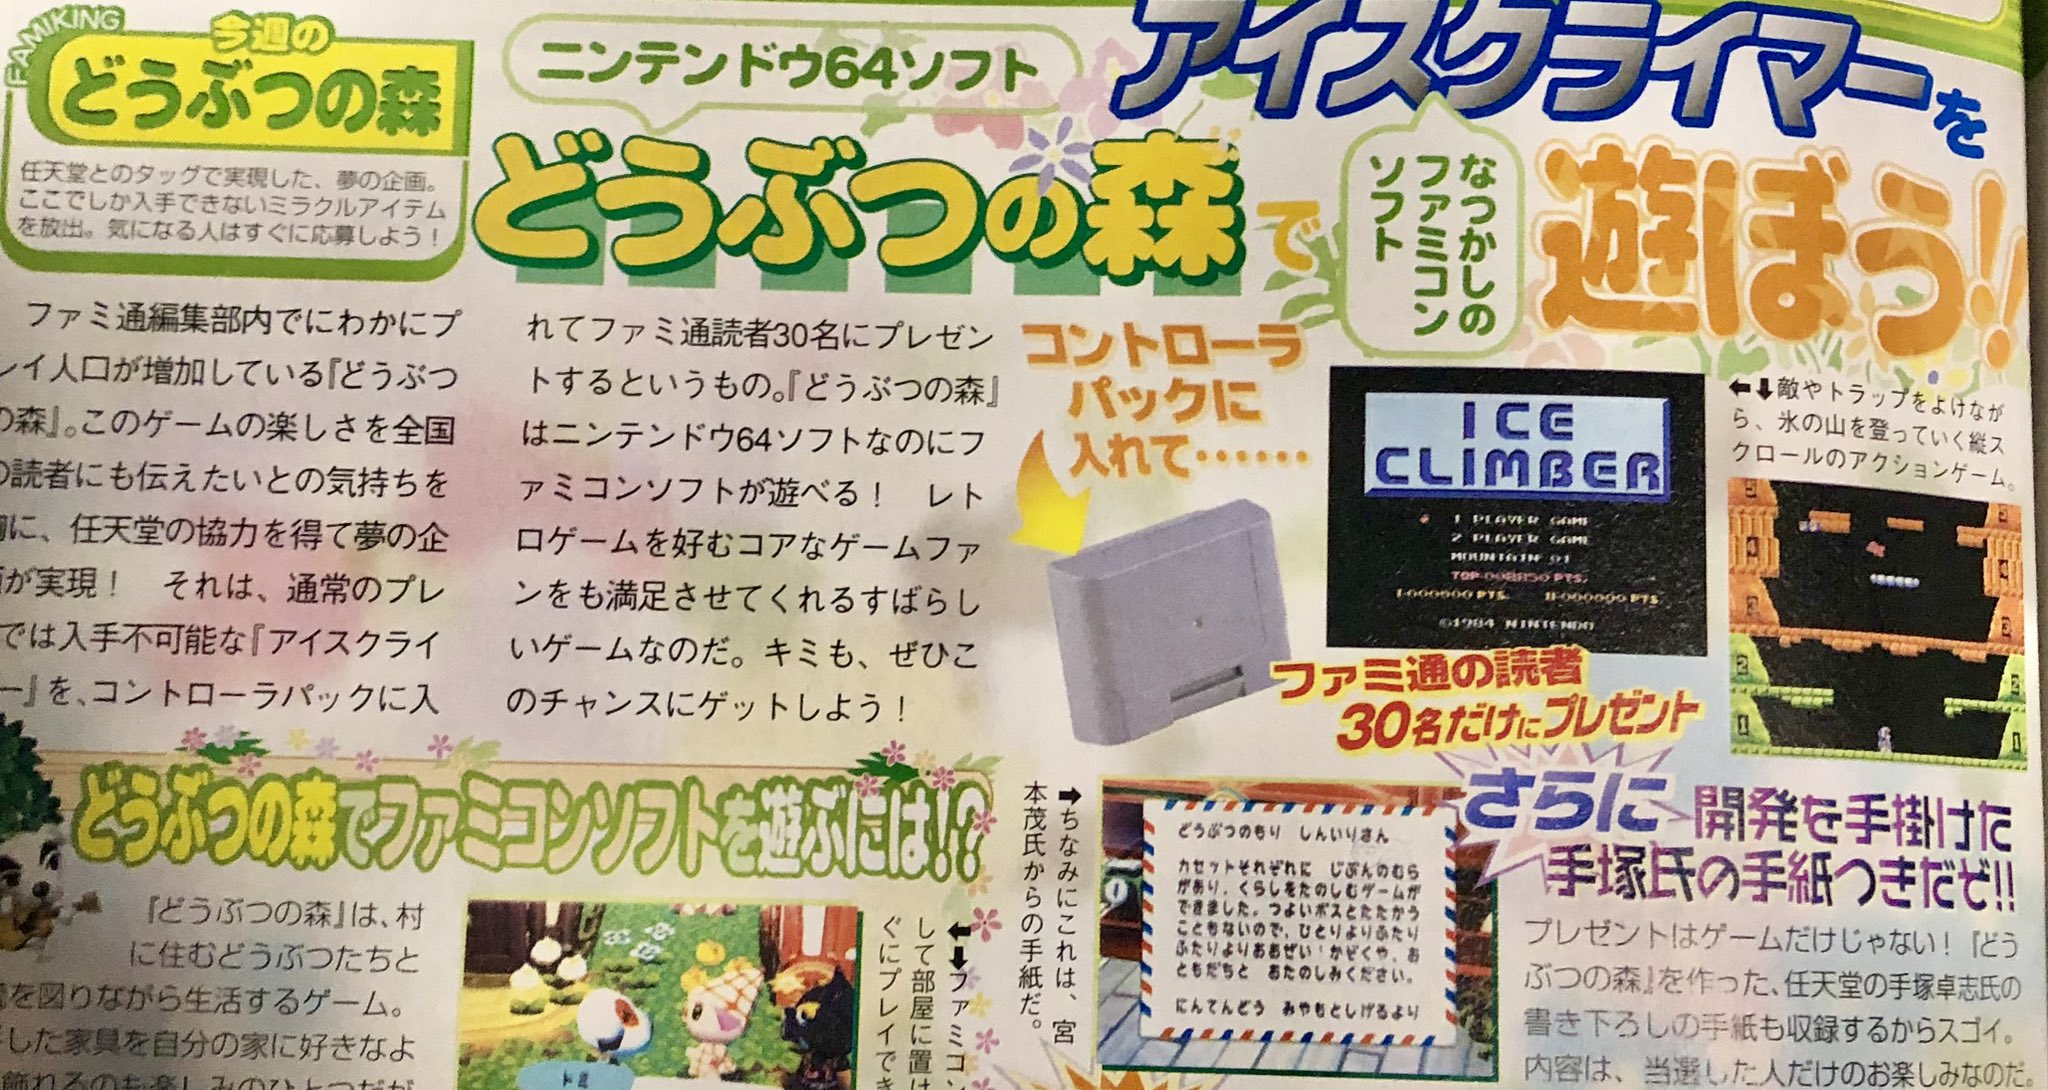
To this day, we have yet to see an actual image or listing of somebody owning one of these elusive Ice Climber Paks online. However, we are very confident that it does exist, since the magazines specifically mention that Nintendo themselves manufactured the Controller Paks. Moreover, Nintendo even mentions this Pak in an official post when Doubutsu no Mori+ released.
Not only is this Pak incredibly rare, but if they’re anything like other Controller Paks, they use battery-backed SRAM which is a volatile form of memory storage. Since these Paks are almost 25 years old, all of their internal batteries would likely be dead and all the data inside lost to time. Thus, I teamed up with Jhynjhiruu and Cuyler to research and “replicate” this data to the best of our abilities on a physical PCB.
Memory Capacity Problem
The problem with replicating the data of the official Ice Climber Pak is that including both the Famicom ROM and Tezuka’s letter these would take up around 48KB (384Kb) of data. Notably, every official N64 Controller Pak was only ever manufactured with a memory capacity of 32KB (256Kb) and we didn’t have any examples of how to structure a file >32KB to be read by the N64. Nintendo’s own documentation does mention higher-capacity Controller Paks, with them specifically mentioning 64KB Paks being planned. However, those plans fell through and they never actually sold a Pak larger than 32KB…
Of course, there are a lot of third-party Controller Paks out there that advertise being larger than 32KB, but most of them use physical switches and are limited to 32KB anyways. For example, a supposed 128KB (1Mb) third-party Pak would essentially just be four 32KB Paks partitioned together via a physical switch on the shell.
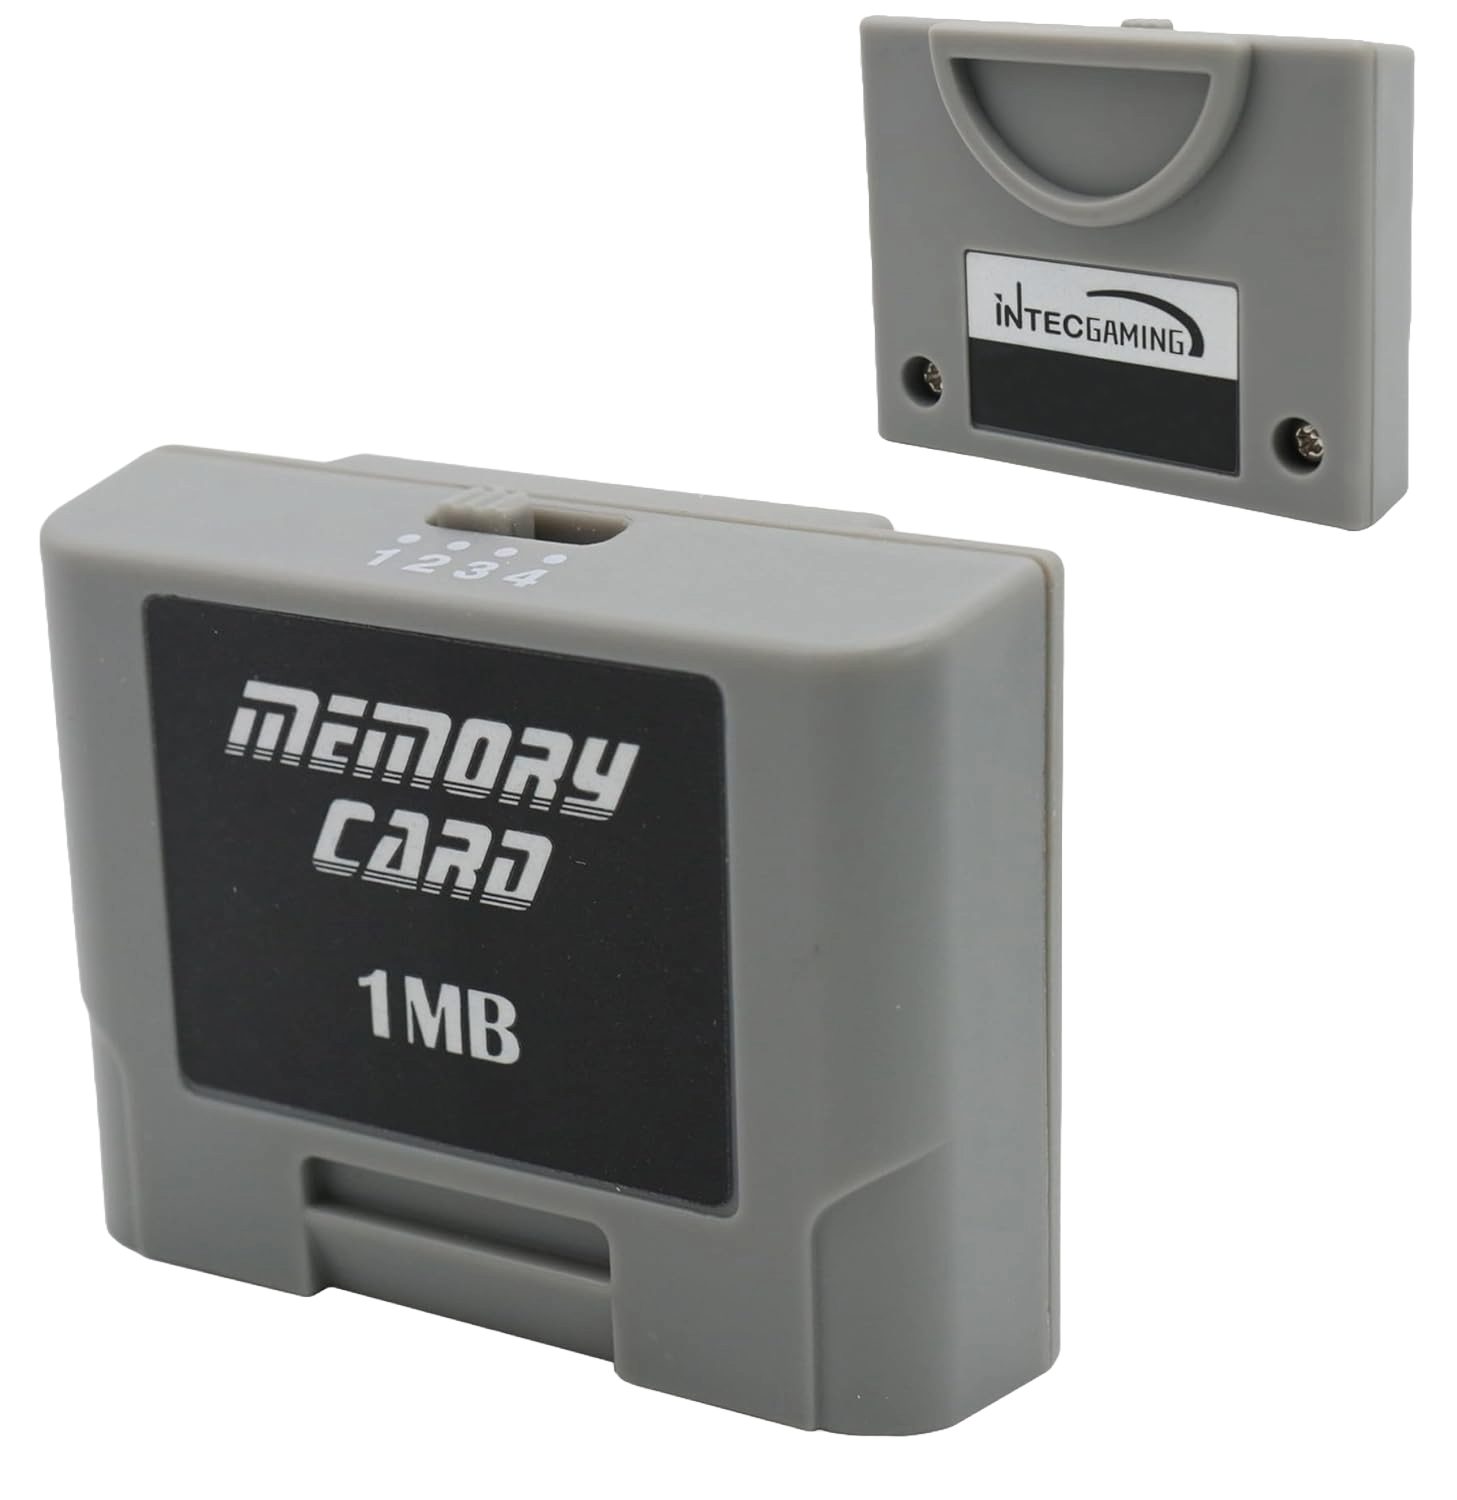
The problem with these Paks is that they rely on the user to move the switch to activate a 32KB bank. With this design, only one 32KB memory section can be exposed at a time, with all the memory in the other switch positions remaining inaccessible. This means it is impossible to store files larger than 32KB on these Paks and all of these third-party Paks won’t work for our 48KB file.
Rediscovering the Solution
After further research into Nintendo’s code, Jhynjhiruu, Cuyler, and Fraser discovered a special bank-switching protocol in the Controller Pak SDK. This bank-switching protocol allows the N64 to read Controller Paks with a higher memory capacity by splitting the data into 32KB banks. The banks here can be seamlessly and automatically swapped between so long as the Controller Pak’s internal filesystem maps it out correctly.
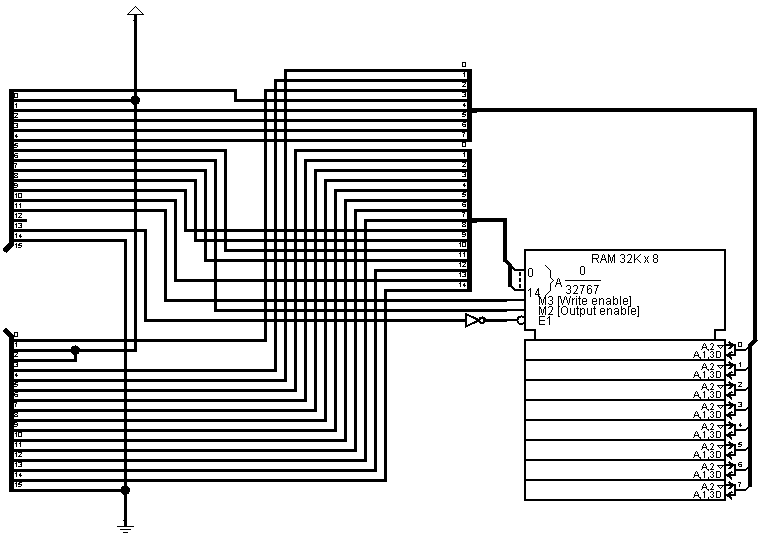
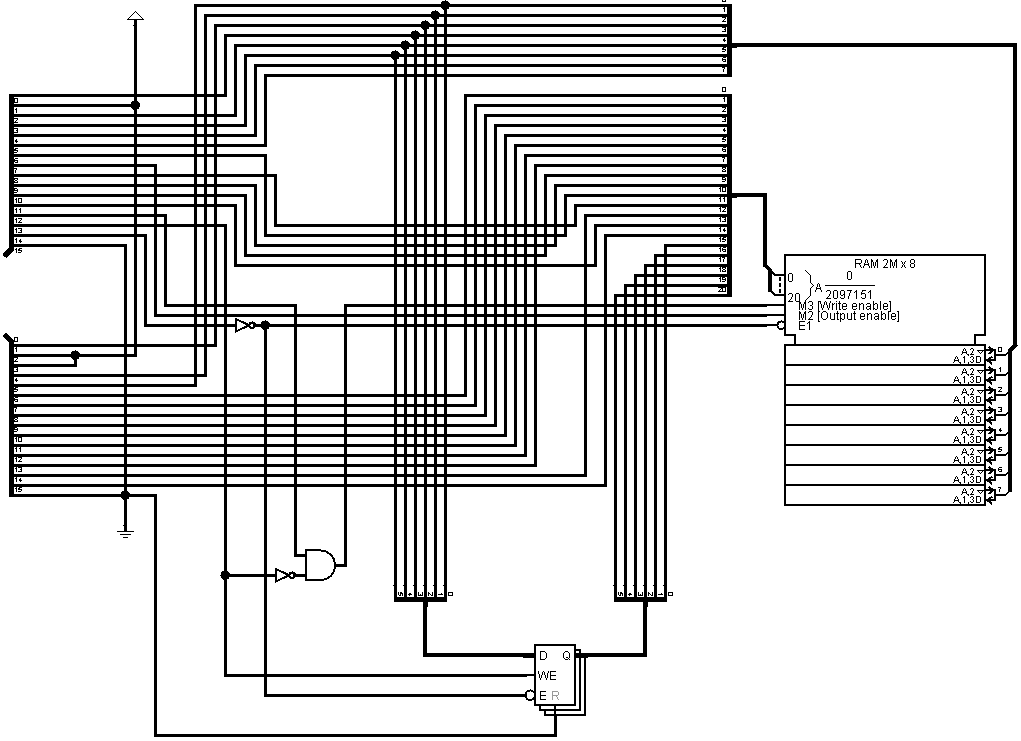
To get technical, the physical connection between the N64 controller and the Controller Pak has sixteen address pins, meaning the console should be able to send 16-bit addresses. This would theoretically allow for up to 64KB of data to be transferred, but instead, Nintendo defined that access to address 0x8000 and beyond (>32KB) should instead be treated as commands to switch to a new bank. Specifically, when the console writes to an address where the highest bit (16th) is set, the signal to write to the memory chip is disabled. Instead of storing the data in memory, the value being “written” is expected to be captured by the Controller Pak’s banking logic, which uses it to modify the upper address bits sent to the memory chip. This effectively allows for switching to a different 32KB memory bank.
Since Nintendo’s SDK expects commands to be intercepted by actual logic, this means you can’t just install a larger capacity memory chip on a Controller Pak and call it a day. You’d also need a special logic device chip to watch for these commands and handle bank-switching by changing an internal pointer to the appropriate section of any larger capacity memory chip you include.
Below are two simplified circuit mockups that show how the 16-bit address bus on the N64’s accessory port connects to a normal 32KB Controller Pak (left) and a theoretical multi-bank Pak (right), courtesy of Jhynjhiruu.
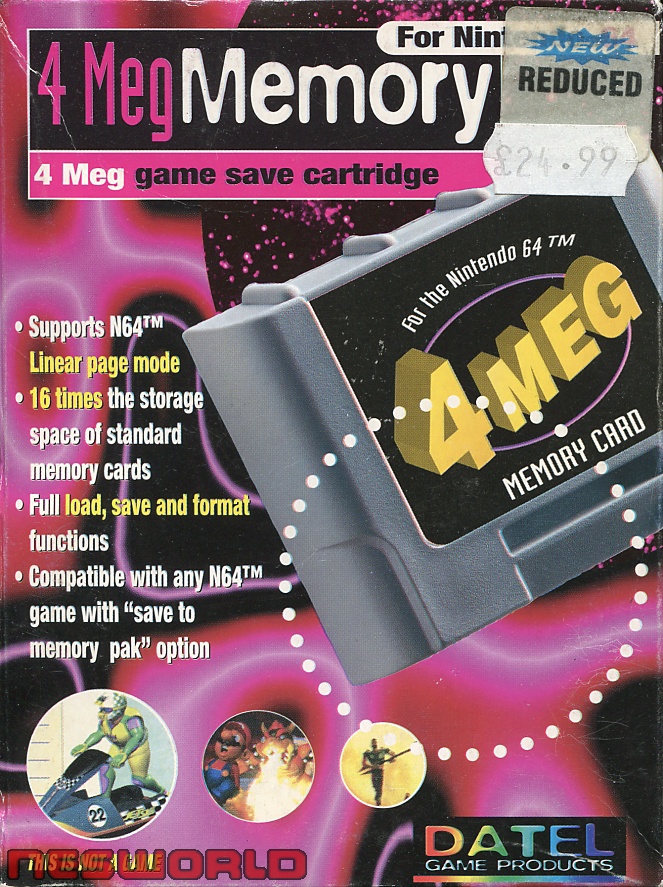
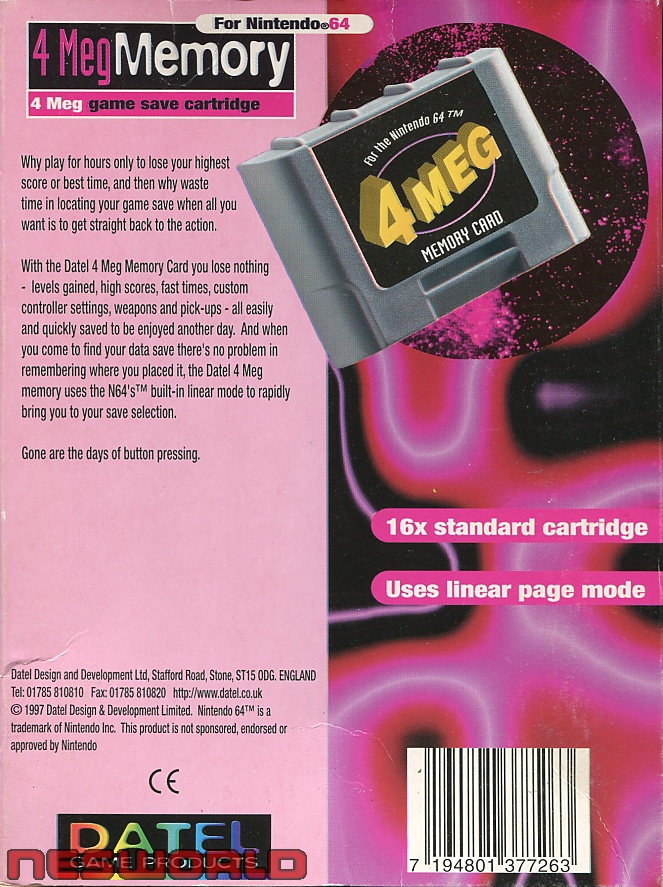
Datel’s 1Mb/4Mb Controller Paks
We later discovered that one company successfully figured this out and manufactured the hardware required to make a true, larger capacity Controller Pak. This company was Datel, who sold a 1Mb and 4Mb Controller Pak utilizing “linear bank switching” following the protocol described above. They knew they had something special too, since they boast about their Paks using “no physical switches” pretty vocally in their adverts.
Better yet, we also have reverse engineered PCB files of Datel’s working board, courtesy of modman. You can find the KiCad schematics here. These give further insight into how Datel built their hardware.
With the discovery of Nintendo’s bank-switching protocol, alongside physical proof of a real Pak utilizing it, we theorized that Nintendo must’ve manufactured their Ice Climber giveaway Paks with a memory capacity of 64KB. This would be Nintendo’s only Controller Pak that utilized two banks, but is theoretically the only way we knew they could’ve fit both the Ice Climber ROM and Tezuka’s letter data on a single Pak.
Formatting the Data
Importantly, the Controller Pak features a filesystem that must map out all of the data on the Pak. Despite understanding how bank-switching worked physically, the filesystem data in the actual Pak also needs to support this structure.
The Controller Pak Filesystem
Every Controller Pak includes a basic proprietary filesystem that is necessary for the Pak to function. Again, all official Controller Paks have a memory capacity of 32,768 bytes and Nintendo splits these bytes into sectors referred to as “pages”. Each page is 256 bytes, allowing for a maximum capacity of 128 pages. However, the first five pages of every commercial Controller Pak are reserved for filesystem data. These five filesystem pages have been well-understood for years, and specific information for the structure of each page can be found on the N64Brew Wiki page.
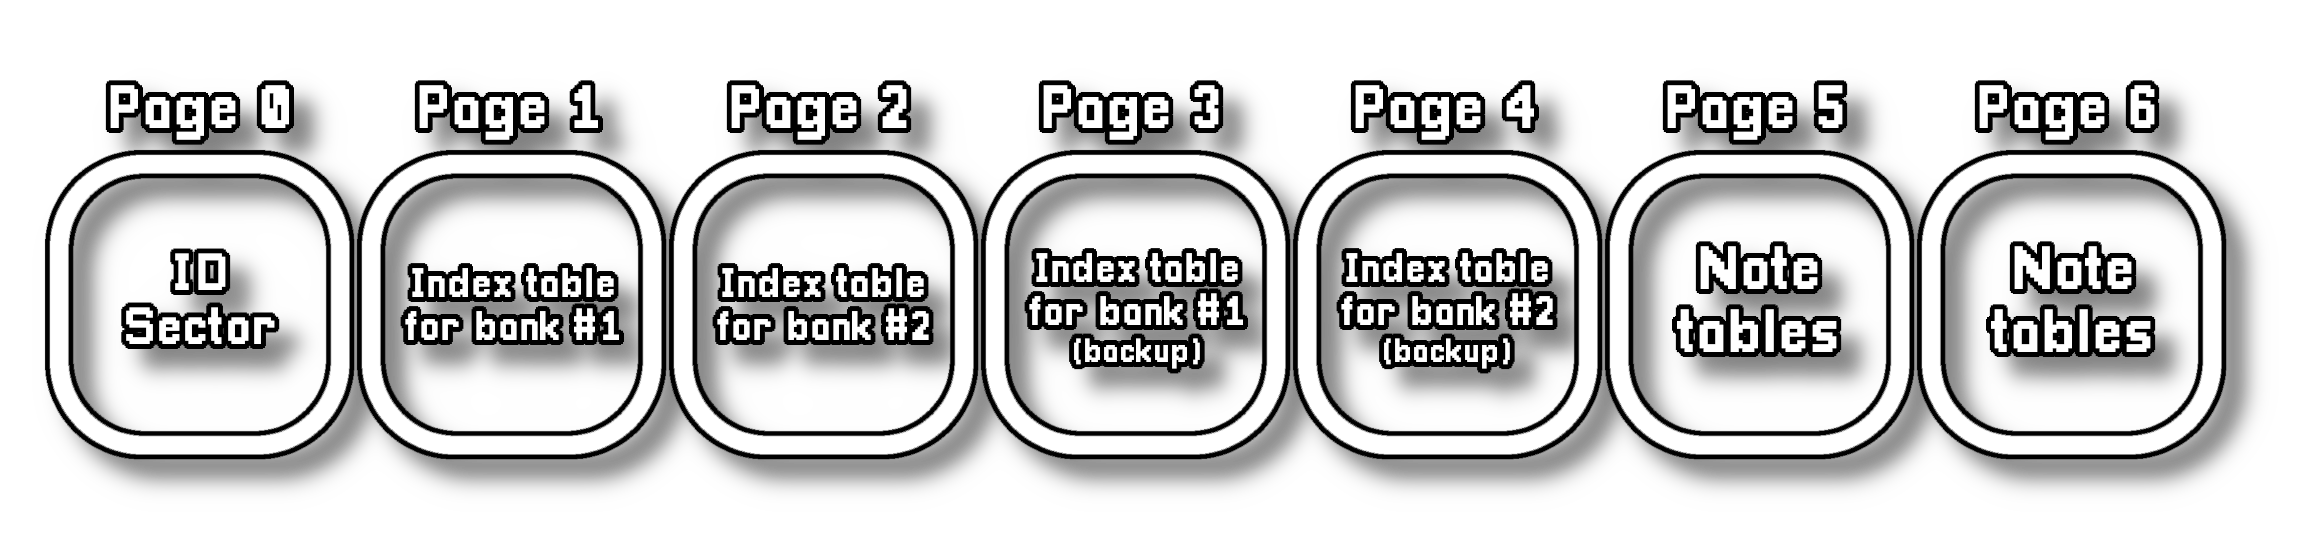
Critically, the bank size flag in the ID block structure describes how many 32KB banks are present in the Controller Pak’s memory chip. By setting this value higher than 01 and having a memory chip greater than 32KB, the Pak now expects its filesystem structure to include an additional two pages of filesystem index tables per extra bank. Those two extra pages are the index table that maps out this extra data, plus a backup of that table. For example, a standard 32KB Pak will have five filesystem pages, but a 64KB Pak requires seven. In a 64KB Pak, the filesystem pages will look like this:
Further, due to the way Controller Paks are read, all of this filesystem data must be present on the first 32KB bank. With two additional filesystem pages (0.5KB) added per bank, a Controller Pak can have a maximum of 62 banks. This allows for a Controller Pak with over sixty times the capacity of a normal one, clocking in at around 2MB.
As long as you understand the filesystem and its checksums, you can theoretically format a multi-bank MPK file manually. However, after some coincidental testing via the iQue Player, we discovered that Doubutsu no Mori will structure a larger capacity filesystem for you so long as you define the special “bank size” byte greater than 01 within the Controller Pak’s first page. It’s likely that other games compatible with a Controller Pak can also set up the larger filesystem structure as well by just holding start on bootup and letting the menu re-format the Controller Pak.
Ice Climber ROM
With the Controller Pak filesystem set up to support at least two banks, this allows us to now slot in the Ice Climber ROM and letter data to replicate Nintendo’s official Pak. These are two different “notes” within the MPK, and must be defined as such. The order in which you place these notes does not matter, it will act the same regardless. Let’s focus on the Ice Climber ROM note first.
In order for any Famicom or NES game to be loaded into Doubutsu no Mori, you must structure the ROM file with a special header that the game can recognize. Specifically, Doubutsu no Mori uses an “NESINFO” wrapper with a proprietary tagging system that instructs the emulator how to handle the game. Ice Climber uses the HSC tag to save high-score data, so this header would look like this:
4E 45 53 49 4E 46 4F 1A 00 00 00 24 00 00 60 10
43 50 4E 10 22 1C 1E 1C 25 22 26 1B 1E 2B 00 00
00 00 00 00 48 53 43 06 87 EC 00 00 00 00 45 4E
44 02 00 00
Prepending these bytes to any standard Famicom/NES ROM of Ice Climber is necessary for it to be read via a Controller Pak in Doubutsu no Mori. Notably, you can also choose to prepend these bytes to a Yay0-compressed ROM of Ice Climber and it will also function just fine, since Doubutsu no Mori supports Nintendo’s Yay0 format. Every Famicom game built into Doubutsu no Mori is Yay0-compressed, so it’s likely that Nintendo also compressed Ice Climber and thus, our official replication did the same.
After including these header bytes, you can slot this ROM data onto a multi-bank MPK file. Of course, depending on where you slot in this data, you must also map out this data within the corresponding filesystem pages and include proper note information. Importantly, for compatibility within Doubutsu no Mori, the note containing Ice Climber must have the game code NAFJ with a file name different than “DOUBUTSUNOMORI”, following the Pak’s custom text encoding. For our purposes, we simply named the note “ICECLIMBER” (22 1C 1E 1C 25 22 26 1B 1E 2B).
Takashi Tezuka’s Letter
Following Doubutsu no Mori’s included letter data bundled with the game, the supposed letter from Takashi Tezuka included in the Ice Climber Pak would have to take up a whopping 103 pages (~26KB) of space. This is because to even store one letter, we have to reserve space for the entire post office mailbox in our Controller Pak. Since the post office mailbox can save 160 letters total, we end up with a lot of unused space, but including it is still necessary. In order to place an in-game letter in the first slot of this mailbox data, it’s important to understand how it works.
By simply saving any letter to the post office mailbox, a note is written to your Controller Pak called DOUBUTSUNOMORI.B. Examining the structure of this note reveals that the post office mailbox works following this structure:
General mailbox data
| Offset | Size | Name | Description |
|---|---|---|---|
| 0x0000 | 2 bytes | Checksum | Big-endian 16-bit sum over all data |
| 0x0002 | 80 bytes | Box names | The names of the eight boxes in the post office mailbox that each hold 20 letters Each name is 10-bytes long, formatted in order of these 80 bytes |
| 0x0052 | 26,240 bytes | Letters | There are 160 individual letters formatted here, with each taking up 164 bytes Letters are formatted in order of their placement in the post office mailbox Empty slots are blanked out with 20 or FF |
Individual letter data (click to expand)
| Offset | Size | Name | Description |
|---|---|---|---|
| 0x0000 | 6 bytes | Addressee name | Name of person receiving the letter |
| 0x0006 | 6 bytes | Addressee town name | The town name receiving the letter |
| 0x000C | 2 bytes | Addressee ID | Internal game ID of the addressee |
| 0x000E | 2 bytes | Addressee town ID | Internal game ID of the addressee’s town |
| 0x0010 | 1 byte | Addressee flags | First bit determines if addressee is an animal villager 0 = human; 1 = animal villager The remaining 7 bits are unknown data |
| 0x0011 | 1 byte | Padding | — |
| 0x0012 | 6 bytes | Sender name | Name of person sending the letter |
| 0x0018 | 6 bytes | Sender town name | Name of author’s town |
| 0x001E | 2 bytes | Sender ID | Internal game ID of the sender |
| 0x0020 | 2 bytes | Sender town ID | Internal game ID of the sender’s town |
| 0x0022 | 1 byte | Sender flags | First bit determines if sender is an animal villager 0 = human; 1 = animal villager The remaining 7 bits are unknown data |
| 0x0023 | 1 byte | Padding | — |
| 0x0024 | 2 bytes | Attached present ID | Internal item ID of the attached present 0000 if no present |
| 0x0026 | 1 byte | Letter sprite | First bit controls color of envelope 0 = red (receiver); 1 = blue (sender) Second bit determines if the letter’s been opened 0 = closed; 1 = opened The remaining 6 bits are unknown data |
| 0x0027 | 1 byte | Name offset | Spacing offset for inserting addressee name in the header |
| 0x0028 | 1 byte | Special sender ID | Used for special NPC letters 00 for a villager/human 01 - 08 for NPCs like Tom Nook, Jingle, etc. |
| 0x0029 | 1 byte | Stationery type | Appended to 0x20 to make up in-game stationery ID Ex: 00 will result in 0x2000 = airmail paper |
| 0x002A | 10 bytes | Header text | Header text of letter Max 10 characters |
| 0x0034 | 112 bytes | Body text | Body text of the letter Max 112 characters |
The text of any written letter in this storage must be encoded following Doubutsu no Mori’s custom character set. This character set is composed of Japanese kana, Basic Latin, and a handful of various symbols. This encoding is shown below:
Doubutsu no Mori Character Encoding (click to expand)
| _0 | _1 | _2 | _3 | _4 | _5 | _6 | _7 | _8 | _9 | _A | _B | _C | _D | _E | _F | |
|---|---|---|---|---|---|---|---|---|---|---|---|---|---|---|---|---|
| 0_ | あ | い | う | え | お | か | き | く | け | こ | さ | し | す | せ | そ | た |
| 1_ | ち | つ | て | と | な | に | ぬ | ね | の | は | ひ | ふ | へ | ほ | ま | み |
| 2_ | ! | ” | む | め | % | & | ’ | ( | ) | ~ | ♥ | , | - | . | ♪ | |
| 3_ | 0 | 1 | 2 | 3 | 4 | 5 | 6 | 7 | 8 | 9 | : | 🌢 | < | + | > | ? |
| 4_ | @ | A | B | C | D | E | F | G | H | I | J | K | L | M | N | O |
| 5_ | P | Q | R | S | T | U | V | W | X | Y | Z | も | 💢 | や | ゆ | _ |
| 6_ | よ | a | b | c | d | e | f | g | h | i | j | k | l | m | n | o |
| 7_ | p | q | r | s | t | u | v | w | x | y | z | ら | り | る | れ | � |
| 8_ | □ | 。 | 「 | 」 | 、 | ・ | ヲ | ァ | ィ | ゥ | ェ | ォ | ャ | ュ | ョ | ッ |
| 9_ | ー | ア | イ | ウ | エ | オ | カ | キ | ク | ケ | コ | サ | シ | ス | セ | ソ |
| A_ | タ | チ | ツ | テ | ト | ナ | ニ | ヌ | ネ | ノ | ハ | ヒ | フ | ヘ | ホ | マ |
| B_ | ミ | ム | メ | モ | ヤ | ユ | ヨ | ラ | リ | ル | レ | ロ | ワ | ン | ヴ | ☺ |
| C_ | ろ | わ | を | ん | ぁ | ぃ | ぅ | ぇ | ぉ | ゃ | ゅ | ょ | っ | \n | ガ | ギ |
| D_ | グ | ゲ | ゴ | ザ | ジ | ズ | ゼ | ゾ | ダ | ヂ | ヅ | デ | ド | バ | ビ | ブ |
| E_ | ベ | ボ | パ | ピ | プ | ペ | ポ | が | ぎ | ぐ | げ | ご | ざ | じ | ず | ぜ |
| F_ | ぞ | だ | ぢ | づ | で | ど | ば | び | ぶ | べ | ぼ | ぱ | ぴ | ぷ | ぺ | ぽ |
Unfortunately, the exact contents of the letter from Takashi Tezuka are not publicly known. Therefore, we took some creative liberties and just imagined what the data would say:
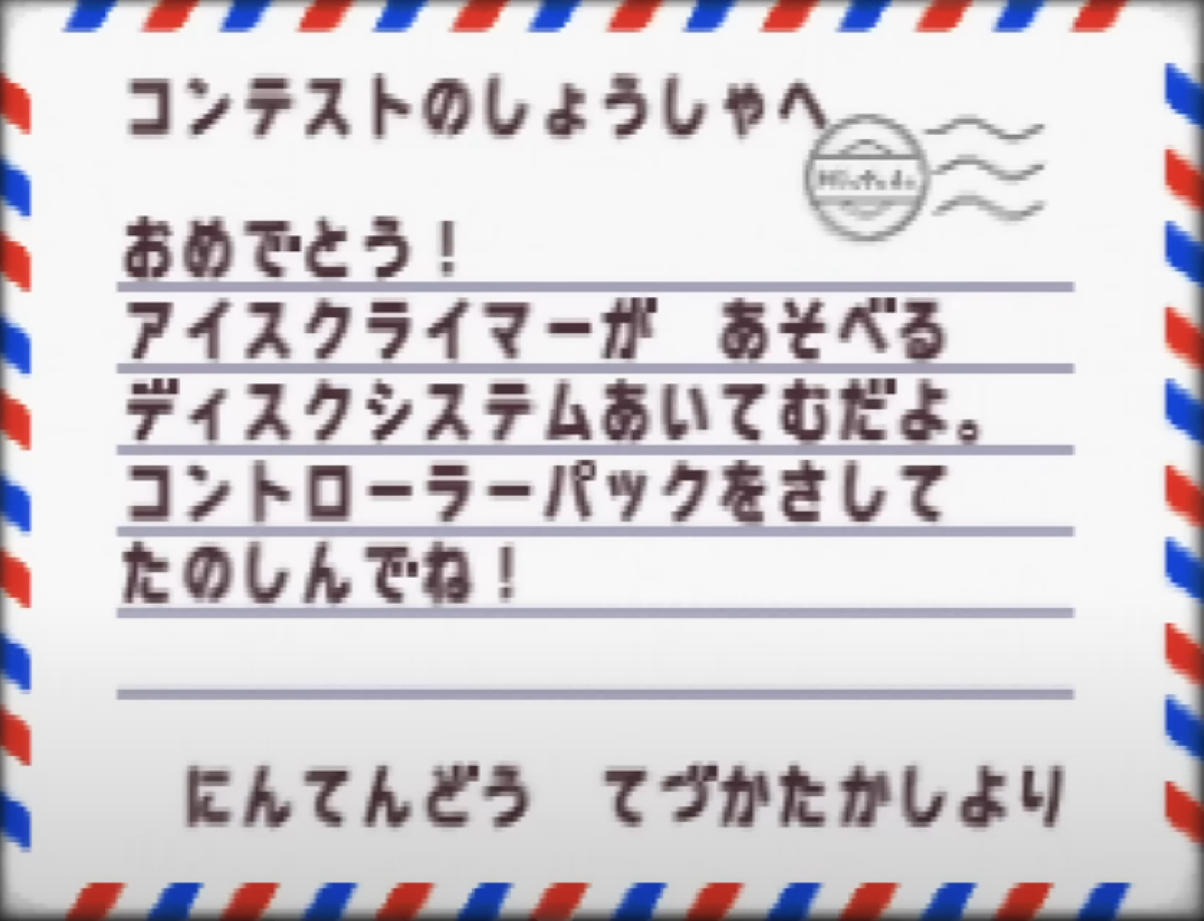
Converted to raw bytes, here is what this letter data would look like, complete with the Disk System item as an attached present:
0B CB 02 0B C9 20 15 1D C3 20 20 20 F0 00 30 00
00 00 12 F3 05 0F 05 0B 15 1D C3 20 20 20 F0 01
30 00 00 00 1D 44 00 06 00 00 9A BD A3 9D A4 18
1C 20 20 20 04 24 F4 13 02 21 20 20 20 20 20 20
20 20 20 20 91 92 9D 98 B7 92 AF 90 E7 20 00 0E
F9 7D 20 20 DB 88 9D 98 9C 9D A3 B1 00 01 12 23
F1 60 81 20 9A BD A4 BB 90 B7 90 E2 8F 98 C2 0A
0B 12 20 20 0F 18 0B C3 F4 17 21 20 20 20 20 20
20 20 20 20 20 20 20 20 20 20 20 20 20 20 20 20
20 20 20 20 15 C3 12 C3 F5 02 20 12 F3 05 0F 05
0B 60 7C 20
After inserting this data in the first box of our general mailbox data (at 0x0052), fixing the checksum, and defining the data in our filesystem pages, this note is now ready for use and can be built into a MPK file alongside the Ice Climber note.
Testing the Data
If you want to test this MPK file on emulator, you can now do so on the latest version of Ares which was recently updated to support bank-switching in Controller Paks thanks to Cuyler. Depending on your settings, you may have to rename your file to use Ares’ .pak extension and place it within the same folder location of your Doubutsu no Mori ROM.
Holding start while booting up the game should bring up a Controller Pak data manager screen, where you should find your ICECLIMBER. and DOUBUTSUNOMORI.B notes. You can test further by talking to the post office attendant and checking the mailbox storage to see if your letter is actually in the first slot. If it is, you should be able to take out the attached Disk System item, place it in your home, and interact with it to boot into Ice Climber.
Real Hardware Options
Putting a custom MPK larger than 32KB on physical hardware is a bit tricky since, again, you’ll not only need a Controller Pak that has a higher capacity memory chip, but you’ll also need a microcontroller to handle the bank-switching commands sent by the N64. Still, if you want this data to work on a real console, you have several options:
Buy a Datel Controller Pak
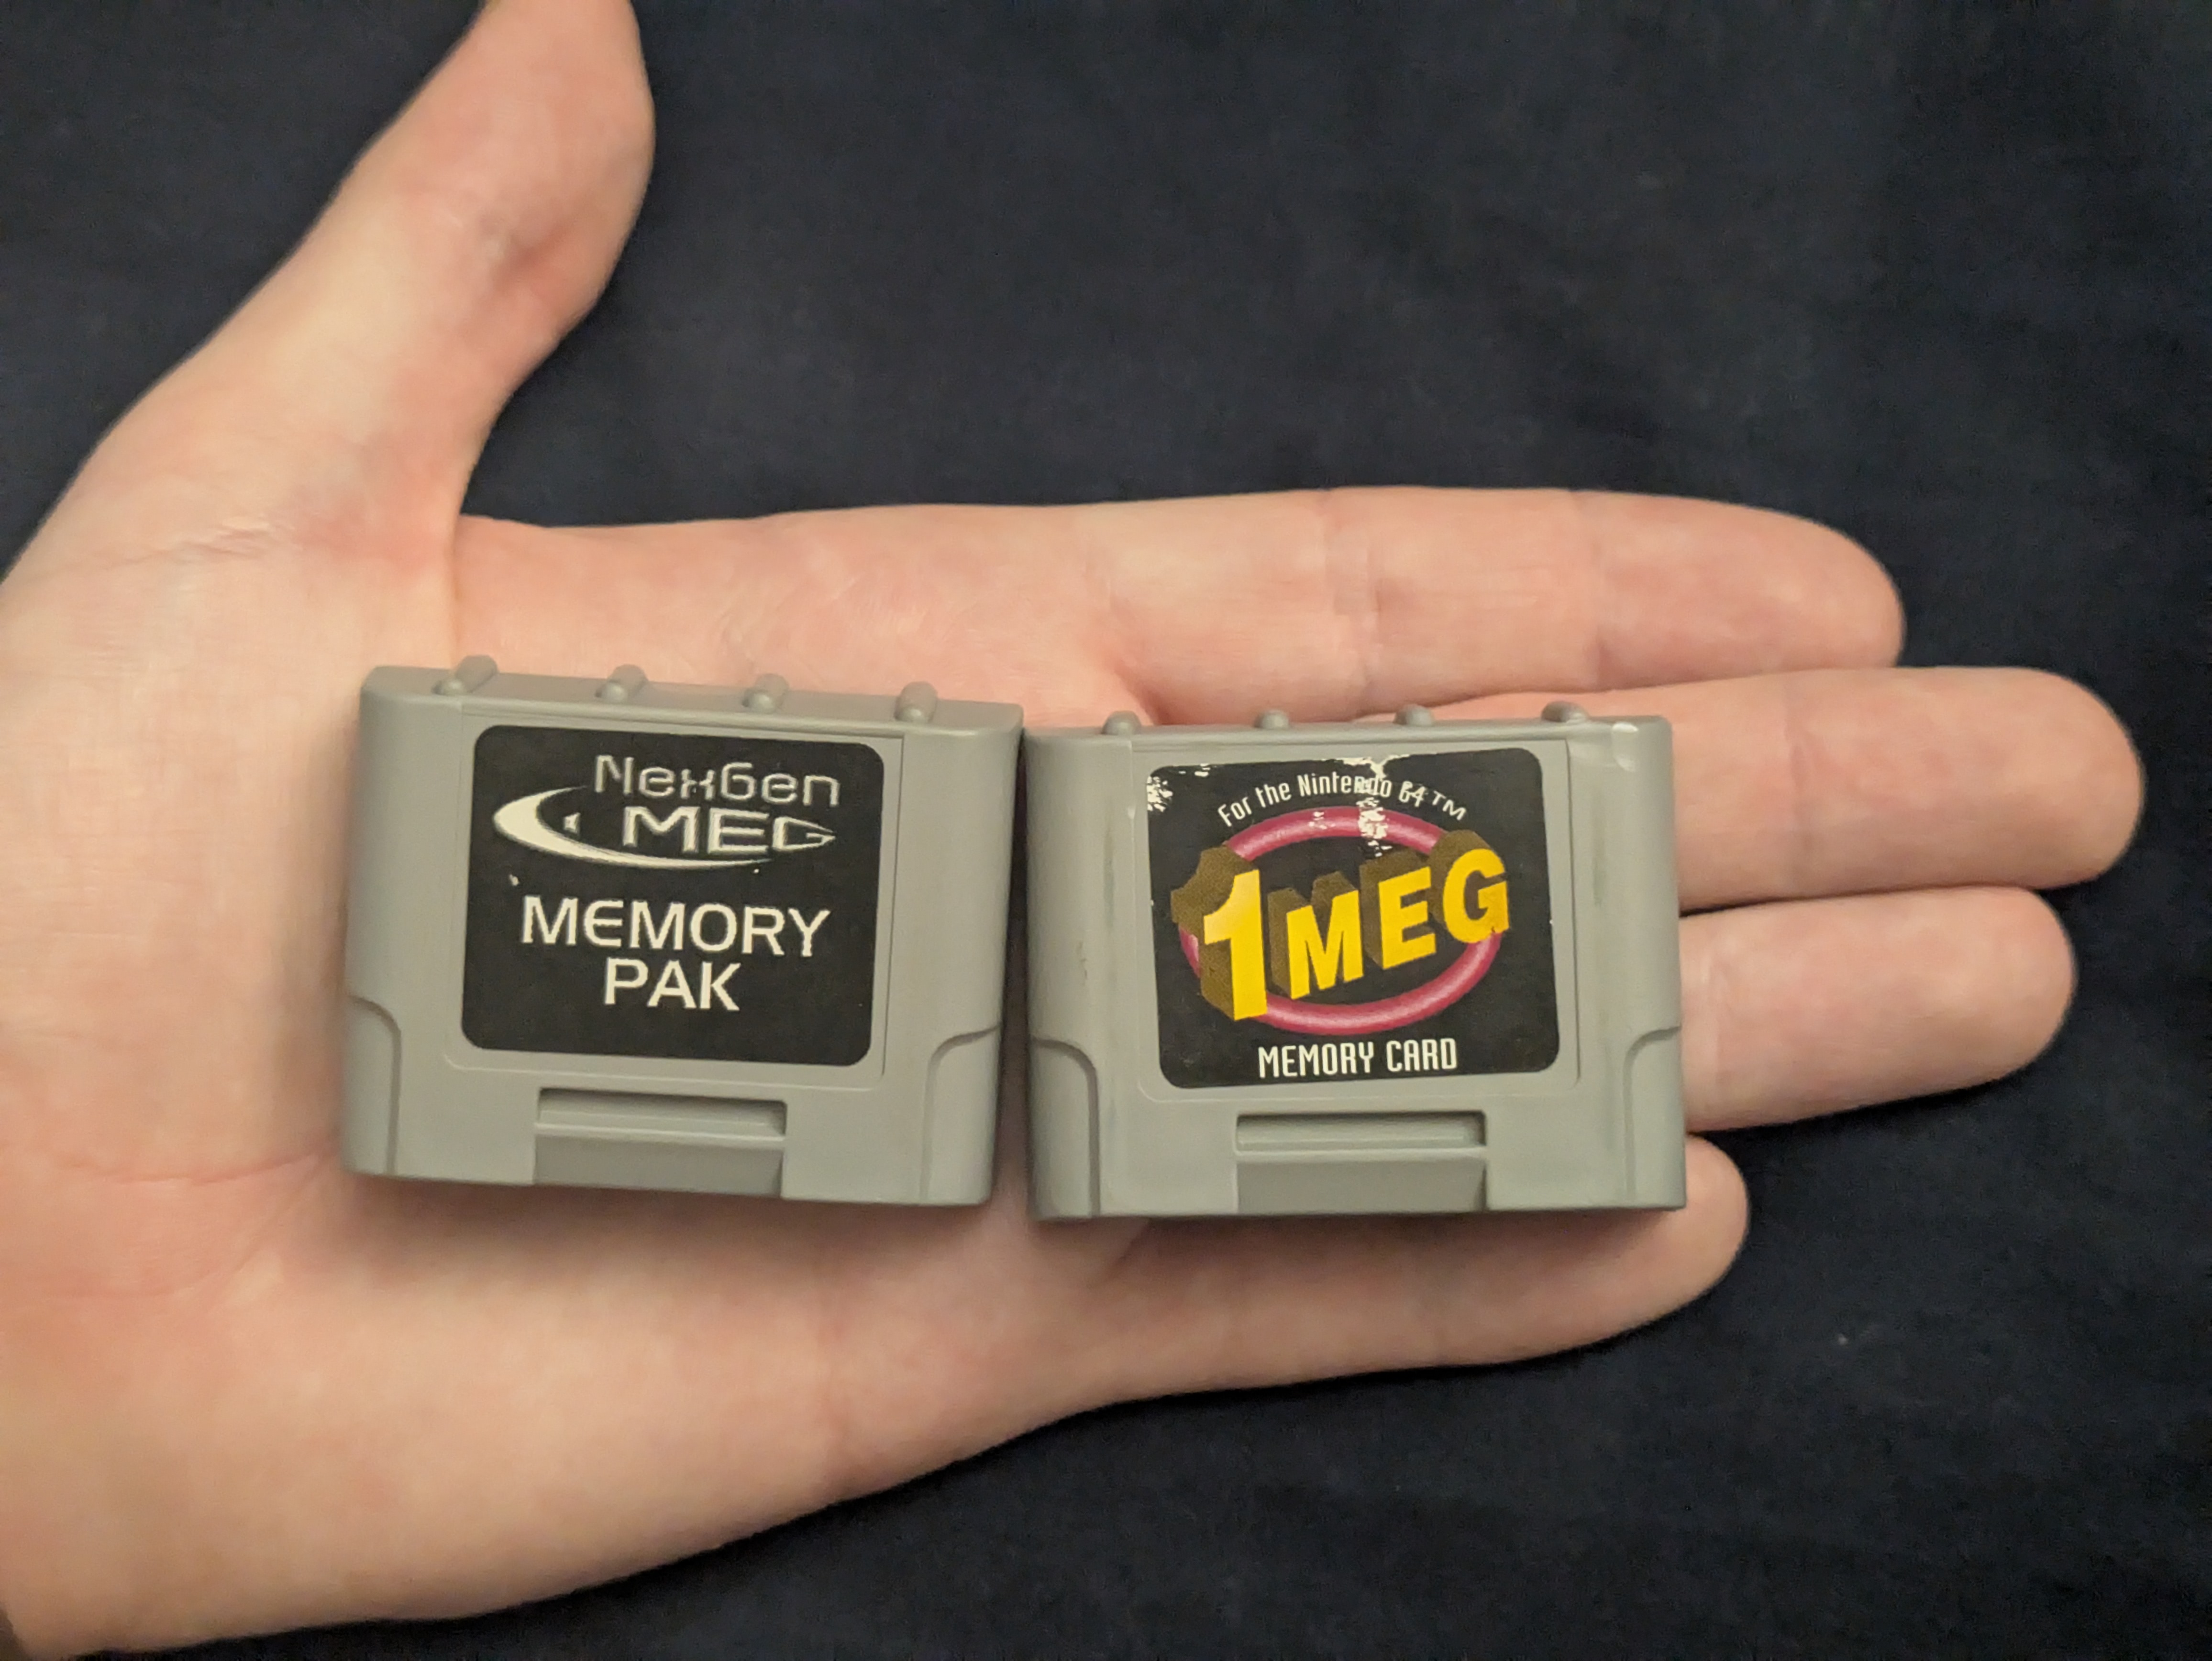
By far the easiest solution would be to find a Datel “1Meg” or “4Meg” Controller Pak for sale online. To our knowledge, these are the only commercial Paks that have the hardware required to handle linear bank-switching. However, these Datel Paks were only ever sold in the UK and they’re quite difficult to find online. Even if you do find one, be aware that Datel’s Paks still use battery-backed SRAM, meaning you’ll likely need to install a new battery.
We’re now aware that these Paks were also sold under the “NexGen” subbrand, so you may be able to find some “NexGen 1Meg” Paks or other subbrands that use the same hardware.
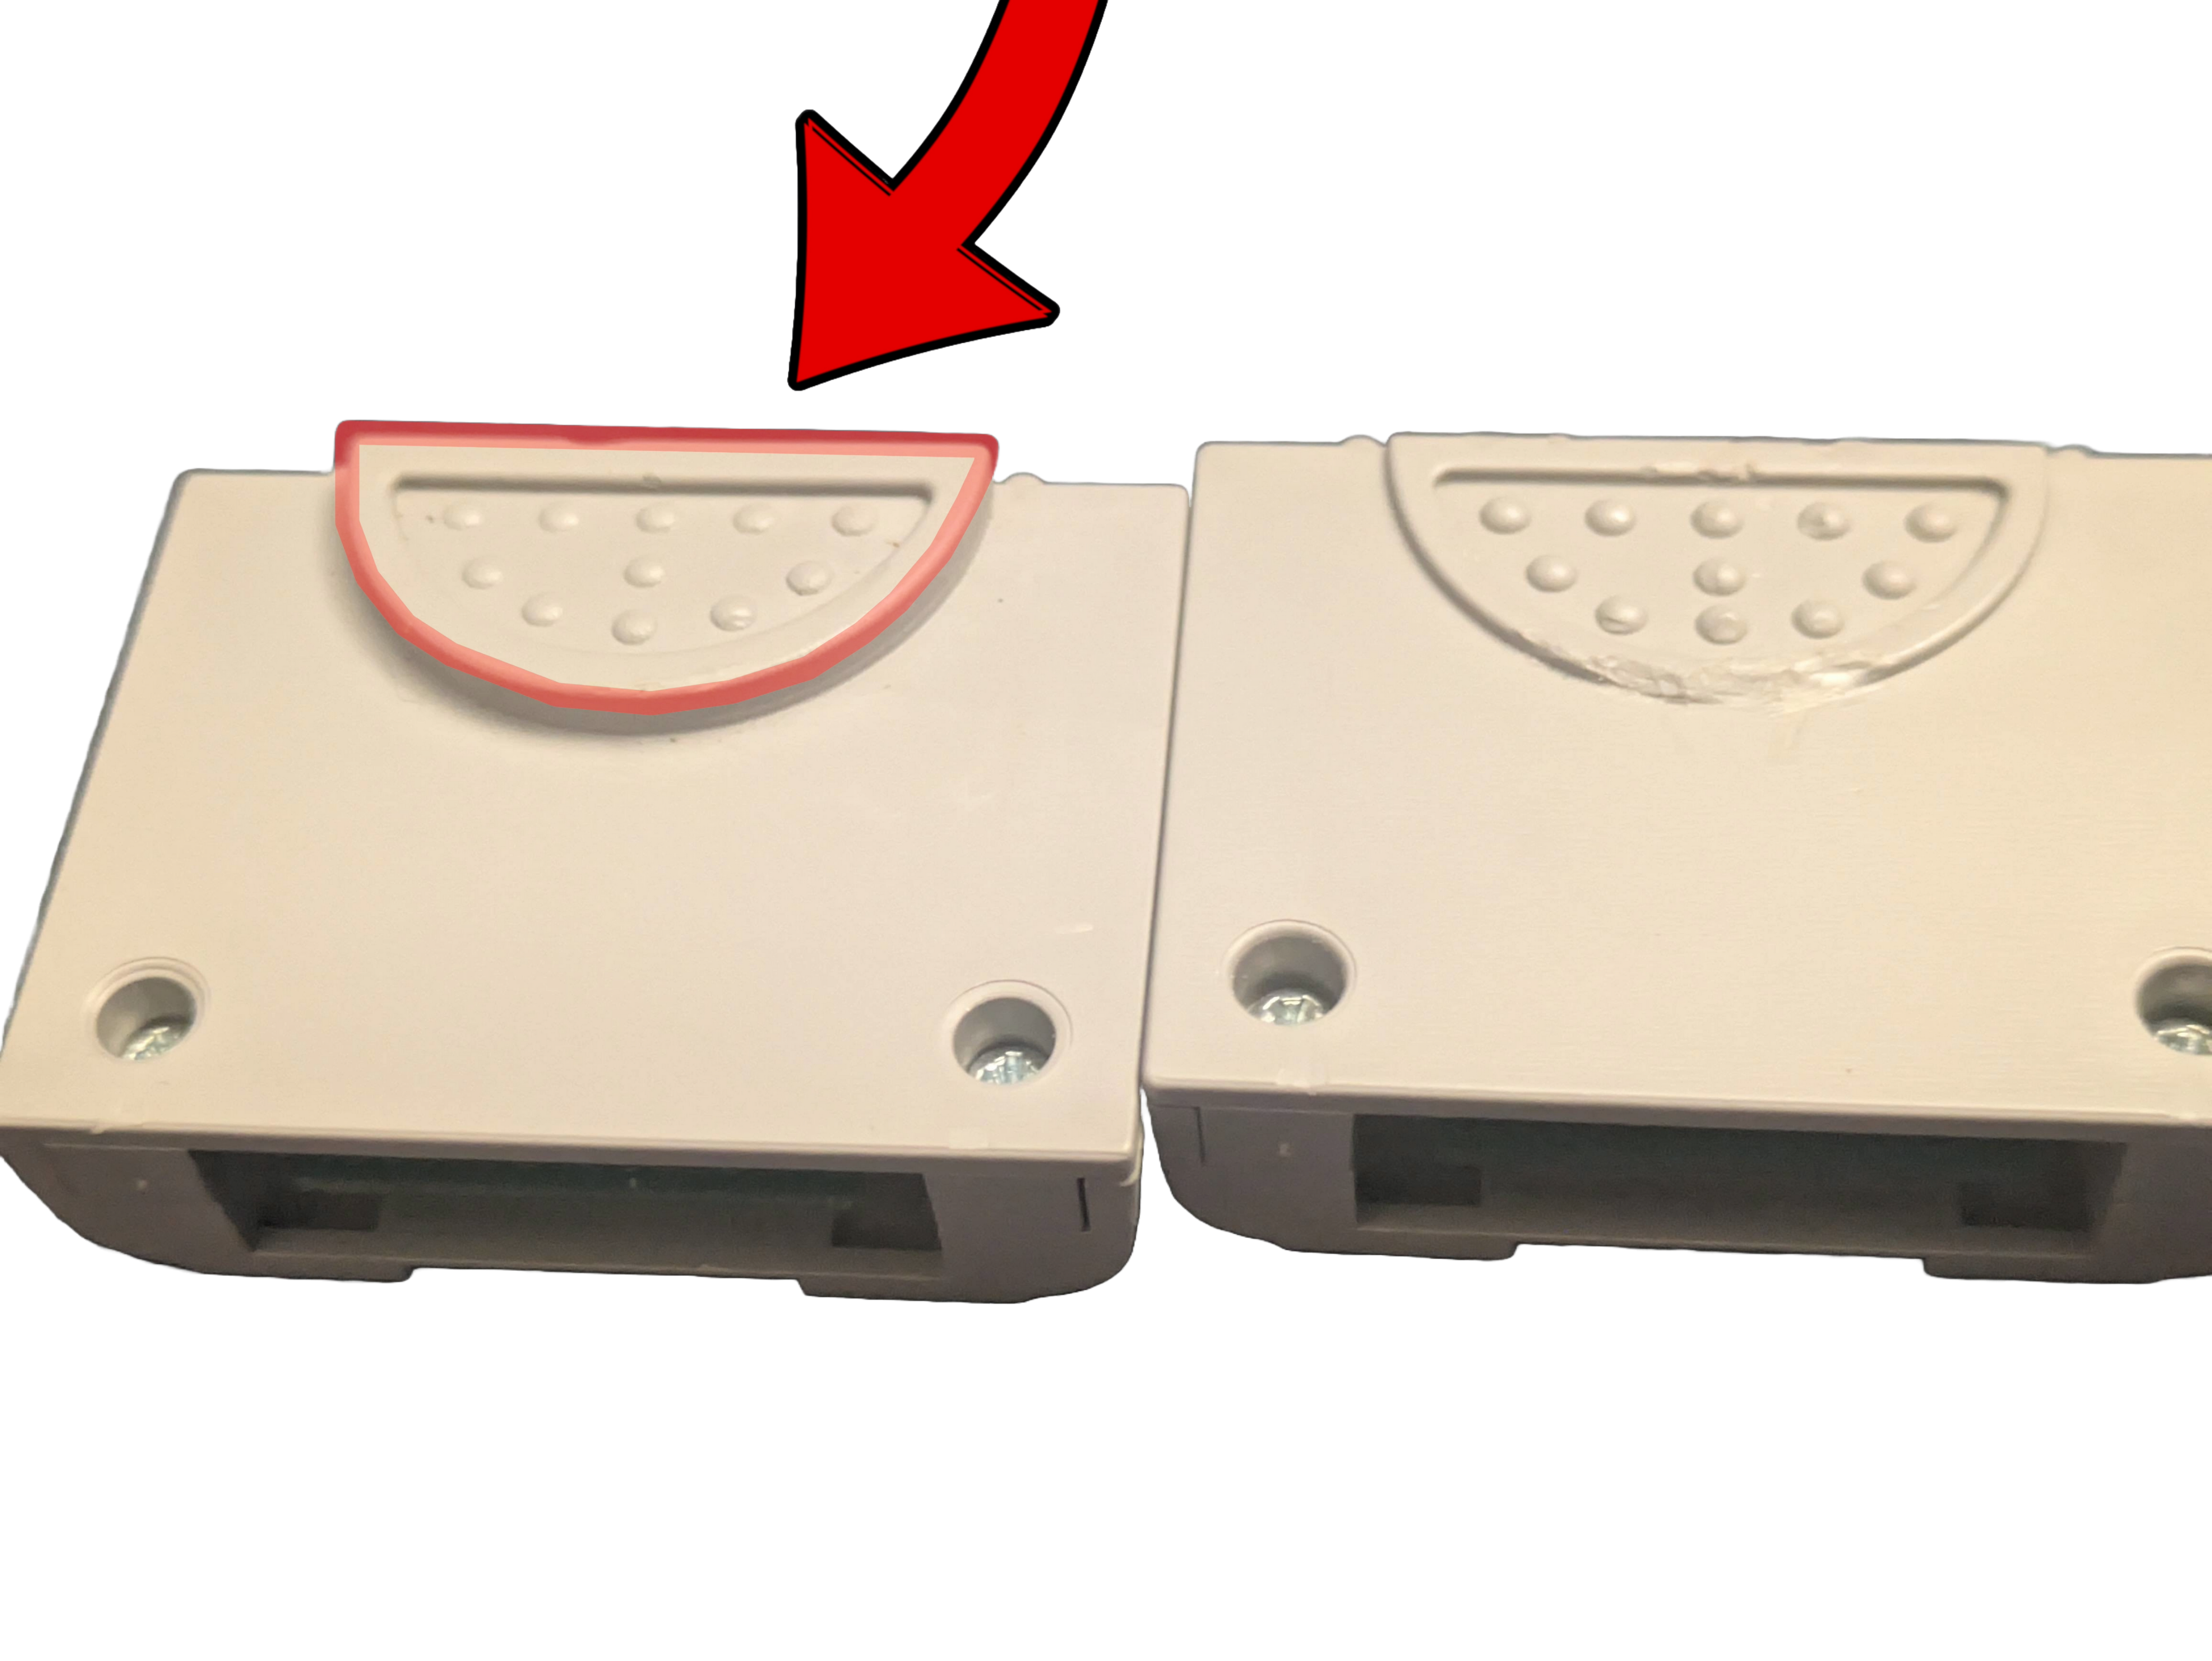
Finding these Paks may be difficult since a lot of listings online don’t specify the brand or really know what they have. As a general guide, all Datel/NexGen Paks that we’re aware of have this special dotted ridge on the back of the shell.
Even if you’re lucky enough to own one of these Paks, you still have to find a way to insert your MPK file on it. To my knowledge, there aren’t any PC adapters or software that supports writing to >32KB Paks. Thus, you’ll likely need homebrew software launched via a flashcart with SD card support to view/dump/write to these Datel Paks. You may also be able to use something like an Action Replay or Gameshark to manually transfer the note files from an existing Controller Pak to a higher banked one.
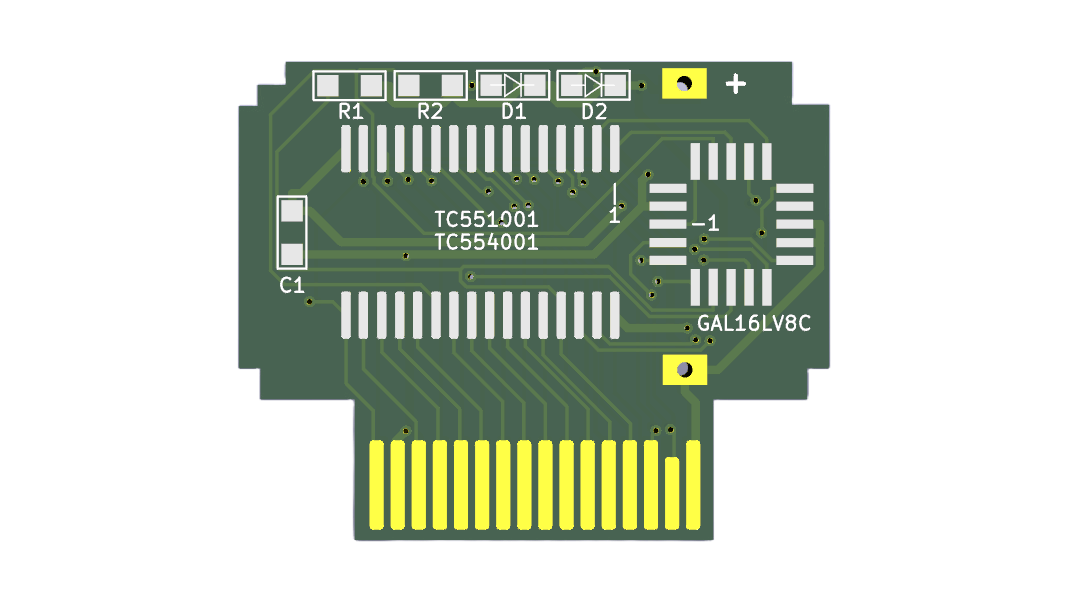
Build a Custom Controller Pak
If you’re tech-savvy enough, you can also build your own Controller Pak by ordering the necessary parts to do so. You’ll need a Controller Pak PCB, a memory chip with at least 64KB of storage, and a logic chip to handle bank-switching.
For our project in particular, we piggybacked off of zwenergy’s CPAK2040-Zero project. This project utilizes a custom PCB connected to an RP2040-zero, which acts as both a memory chip and a microcontroller. zwenergy’s base design follows a similar structure to many third-party Controller Paks, where it simply stitches together ten 32KB Paks without utilizing Nintendo’s bank-switching protocol. However, Jhynjhiruu modified this code to support higher capacities and added microcontroller functions to intercept the bank-switching command. After this change, the RP2040-zero now acts as virtual memory chip holding 64KB of data on its internal SRAM before later storing said data on its internal flash to keep it non-volatile. At the same time, the firmware on the RP2040-zero listens for the bank-switching command from the N64 and handles it by swapping to the correct bank buffer in the virtual memory offset.
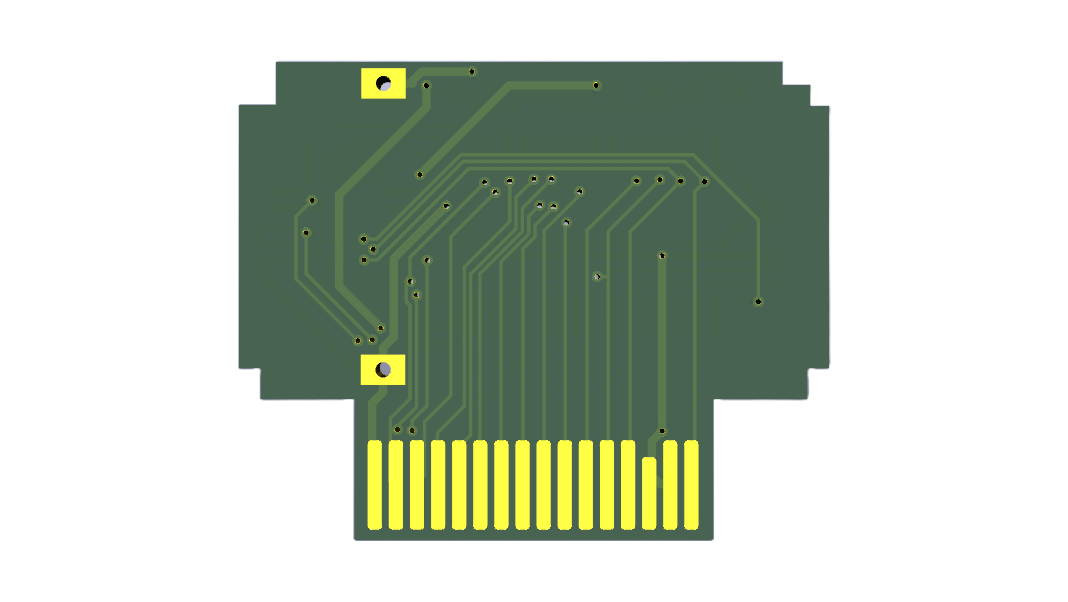
However, we originally believed that bank-switching also required a physical modification to zwenergy’s PCB design. The N64’s accessory port supports a 16 bit address, but most Controller Pak PCBs leave the 16th bit disconnected since the SRAM only uses 15 bits for addressing. We thought zwenergy’s PCB design did the same thing since we didn’t have proper schematics of it. Connecting this 16th bit is required for bank-switching to work since the command requires writing beyond 32KB, so we got around this supposed physical limitation by connecting a bodge/jumper wire from an unused RP2040-zero IO pin to the 19th pin edge of the PCB and patching the code to handle it.

We later learned that zwenergy’s PCB actually does connect the 16th bit by bridging A15 to one of the GPIO lines. Thus, we actually made this process a bit more complicated than it needed to be and you can theoretically just patch in bank-switching firmware without the need for any PCB modification. Still, the code Jhynjhiruu made to patch in bank-switching is a very hacky solution that removes some features of the base code. Further, since our patch is hardcoded with actual ROM data, we can’t actually share it here. However, zwenergy has expressed interest in updating the firmware to support bank-switching properly. I’ll update this page in the future if such plans ever come to light.
For the purposes of replicating the Ice Climber Pak, two banks is more than enough. But if you truly want a mega Controller Pak that can hold more banks, you’ll need to build your own custom hardware like Datel did. This would include a custom PCB that bridges a higher-capacity memory chip (preferably FRAM/MRAM) and a logic chip to properly-measured edge connectors. Here’s an image of the Controller Pak’s official pinouts, courtesy of N64Brew:

Simulate an N64 Controller via a Pi Pico
If you don’t want to solder to an entire PCB, you can also simulate an entire N64 controller through a Raspberry Pi Pico. Polprzewodnikowy’s PicoJoybus project implements Nintendo’s Joybus protocol onto a Pi Pico, which includes support for the Controller Pak. Once again, Jhynjhiruu provided modified code to support higher capacity Controller Paks. This is another hacky solution, but by running build_cpak.sh and placing your MPK data into the data.h file, you can build a UF2 file to flash to the Pico. This will allow it to act like an N64 controller with a larger Controller Pak plugged in.
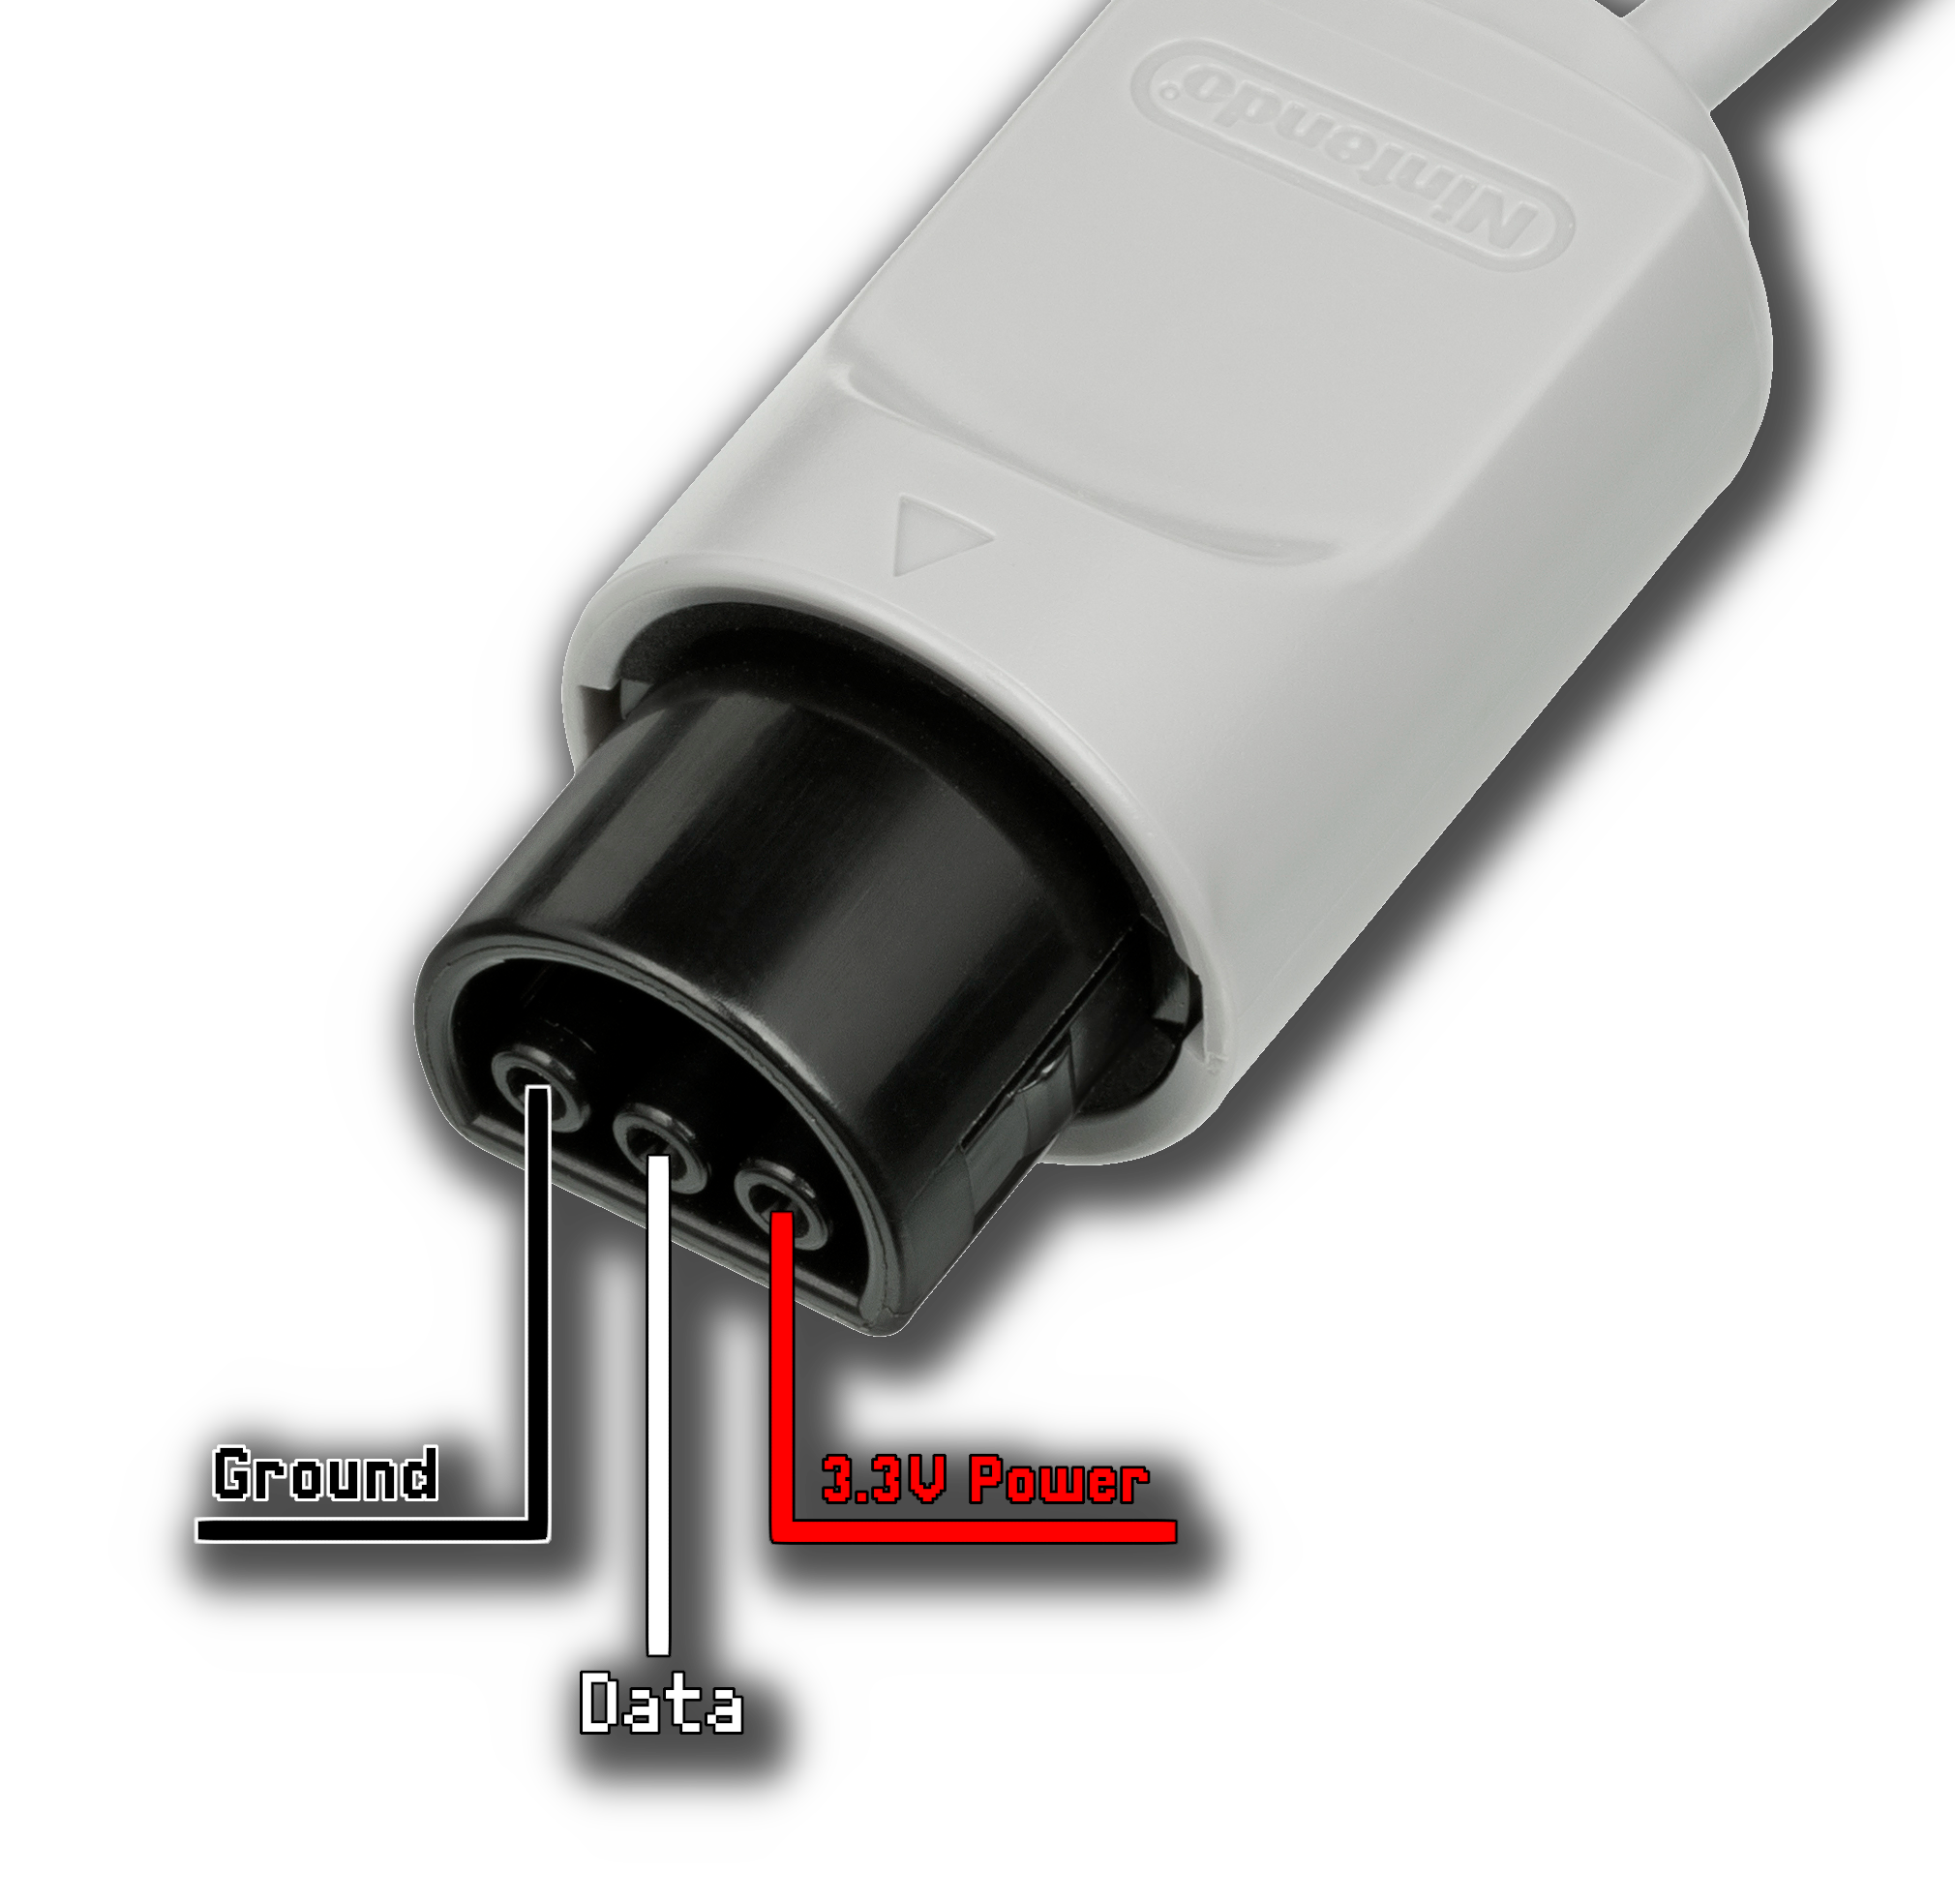
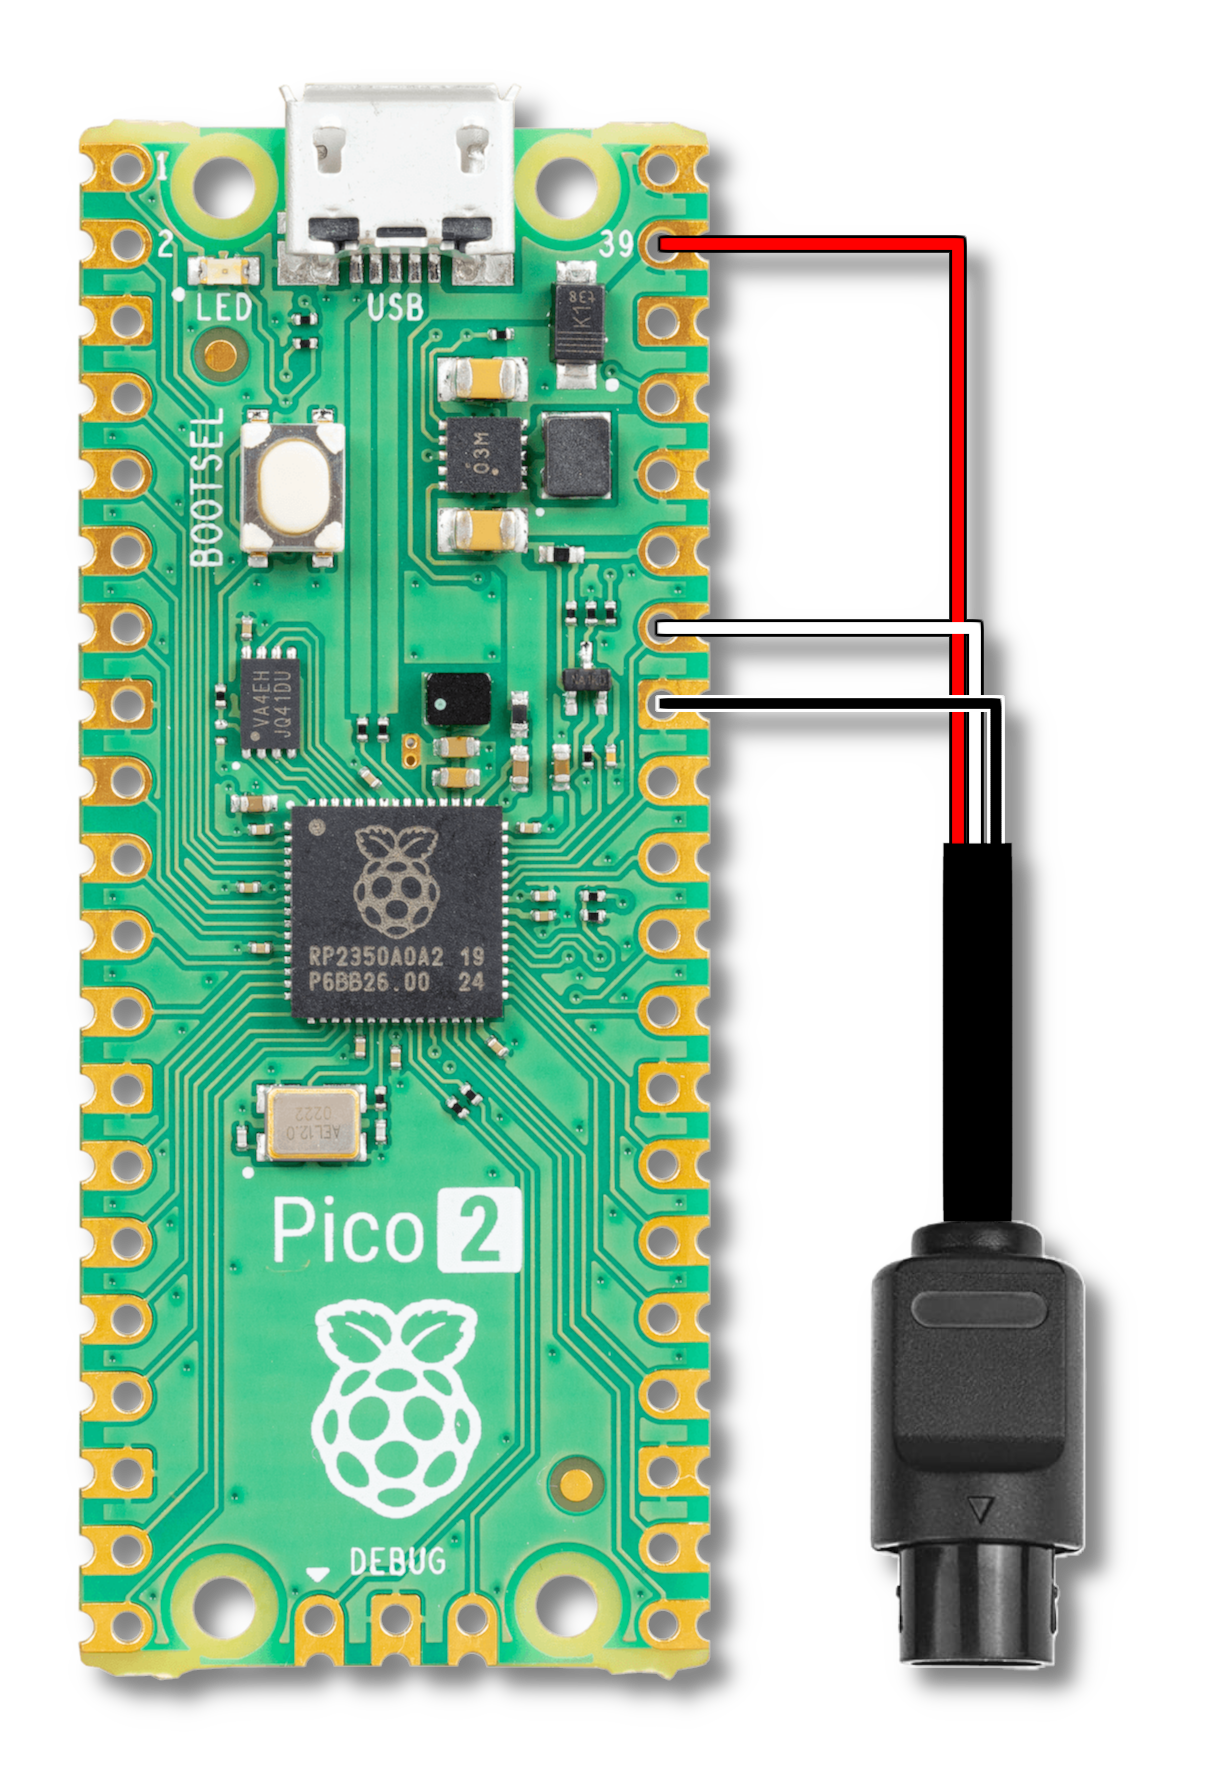
To properly connect the Pico to your N64, you’ll want to buy an N64 extension cable, cut it in half, and strip the wires. You should be left with three wires, one for power (usually red), one for data, and one for ground (usually black). Following Jhynjhiruu’s firmware, you’ll want to connect the power wire to pin 39, the data wire to pin 34, and the ground wire to pin 33. The diagram below shows my setup with a Pi Pico 2, but the original Pico should work as well.
With this setup, you should be able to plug this Pico-controller hybrid into the second port on your N64 and it will treat it as a controller with a Controller Pak plugged in. Of course, you’ll need to plug an actual N64 controller into the first port to actually move around and play the game.
To take this project further and remove the need for a separate controller, you can replicate this setup using a Pico W and wirelessly connect a Bluetooth controller to it. We didn’t actually do this ourselves since we didn’t have a Pico W at the time, but Polprzewodnikowy’s PicoJoybus project supports the Pico W by default - you would just need to implement the bank-switching code on top of it.
Note that there are several other projects capable of emulating an N64 controller via a microcontroller outside of PicoJoybus. We just went with the Pi Pico because we had it readily available, but this could also work with something like an Arduino or other Raspberry Pi boards.
Final Results
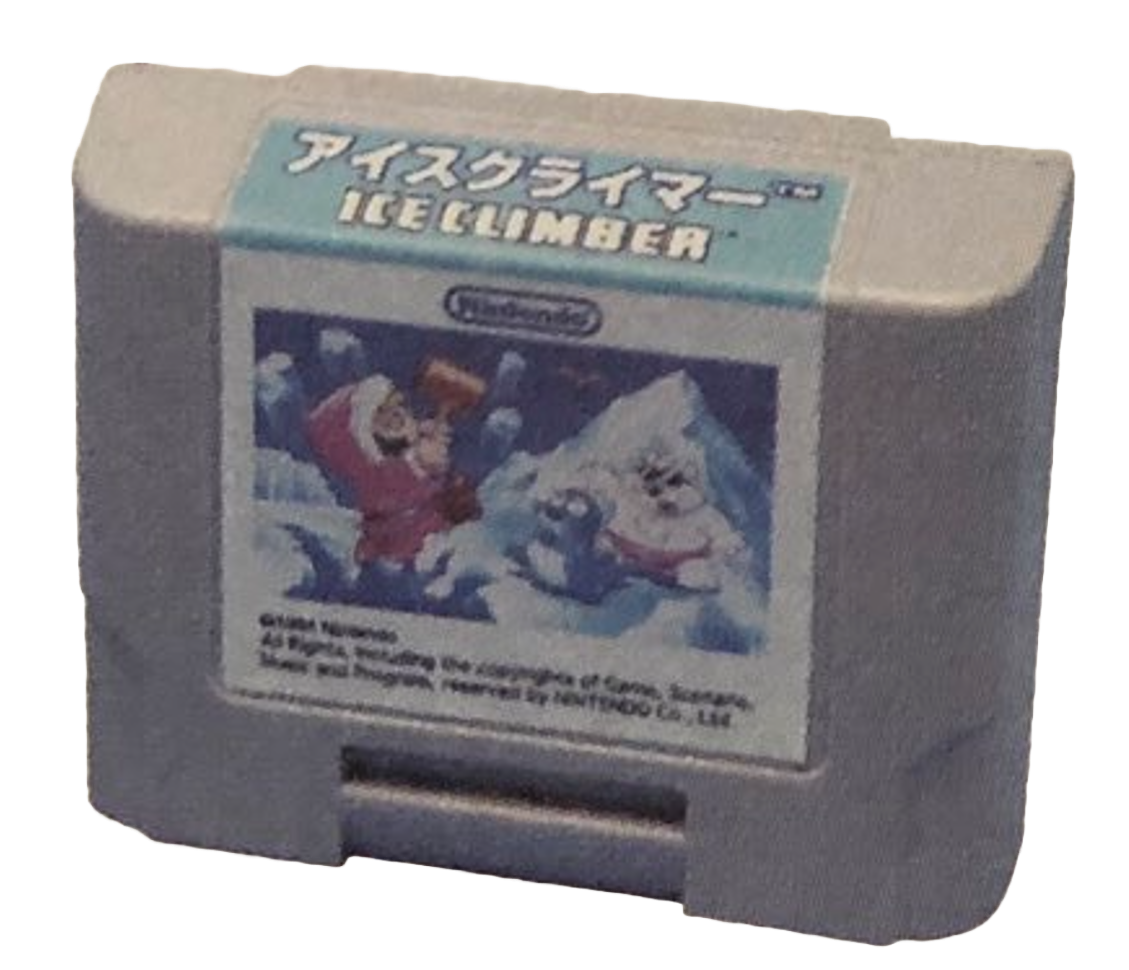
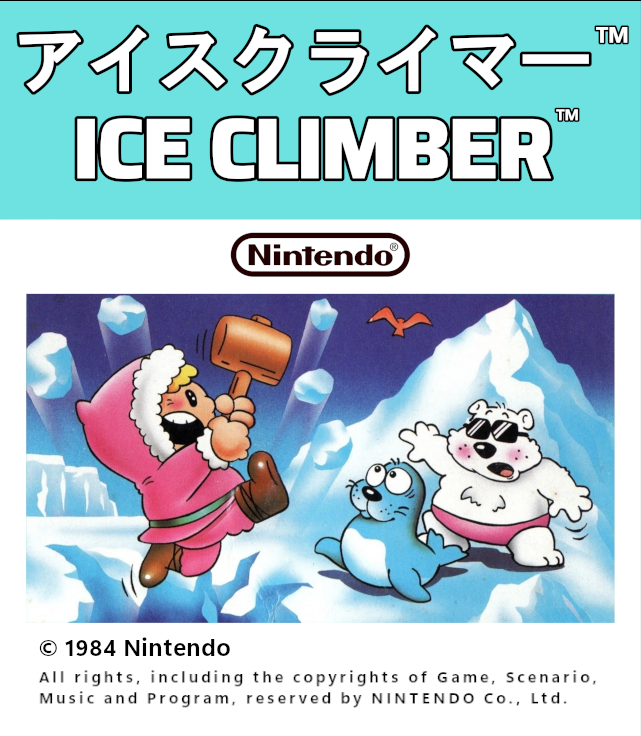
Through all of our research, data recreation, and hardware modding, we were able to successfully get both the Ice Climber ROM and letter onto a physical board for use on a real console. To truly replicate the official giveaway Pak, I also designed a custom label for the Controller Pak shell. This label is included below, and should be printed at a size of 1.2in x 1.4in (approx. 3cm x 3.5cm).
Multibank Compatibility Issues
This project was specifically designed to replicate the Ice Climber Pak for Doubutsu no Mori utilizing a multi-bank setup. However, for more general use, it’s important to note that not every game is compatible with larger capacity Controller Paks. While Nintendo’s programming documentation provides guidance for setting up code to interface with the Controller Pak, they largely left it up to individual game developers to implement their own designs. As such, games like Doom64 hardcode a 32KB limitation for Controller Pak data making it entirely incompatible with multi-bank Paks. Other games, such as Perfect Dark, are technically compatible with the higher size capacity, but display the number of “free pages” incorrectly in their Controller Pak UI.
To our knowledge, most first-party games can handle a multi-bank Controller Pak fine since Nintendo was aware of their own SDK. However, issues with third-party games like this could be why Nintendo never sold a Controller Pak larger than 32KB, despite clear internal plans to do so. The Ice Climber promotional Pak was seemingly an exception since it was obviously designed to be used entirely within one game that supported multi-banked Paks.
Acknowledgments
- Jhynjhiruu for help researching, coding, and documenting a lot of this process over several months
- Cuyler for additional research and coding support
- zwenergy for their CPAK2040-zero project
- Polprzewodnikowy for their PicoJoybus project
- Zoinkity for their research into the N64 and Doubutsu no Mori’s NES emulator
- naporitanPG (ナポりたん) for sharing Japanese magazine information
- Yuki for their assistance with Japanese translations
- Trevor for 3D-printing shells for the Pico and Pak PCB