( Outdated ) How to Modify Animal Crossing e-Reader Card Data
Tutorial
This tutorial is only for the North American e-Reader and that region’s associated card data. Japanese e-Reader data works similarly, but has differing flags that will not be covered.
This tutorial is for relatively advanced users that have knowledge of Git, coding, hexadecimals, and bit logic. This tutorial also assumes you know basic command line prompts and how to run executable files from the command line. If you are simply curious about the process or are looking for downloads, you can find a better document here.
This tutorial will detail, step-by-step, how to modify the data found specifically in Animal Crossing e-Reader cards. A lot of this information is applicable to other e-Reader cards, but this tutorial focuses solely on the cards that are meant to be scanned in the Post Office in the original Animal Crossing for the GameCube.
This can be useful for writing custom e-Reader cards that send custom letters and items only obtainable through this method. Most importantly, this can be used to finally obtain the NES furniture items Super Mario Bros and Legend of Zelda that can only legitimately be obtained through this method. These cards will work on a vanilla console with no modifications.
This process was documented in order to make it easier for any potential future devs / modding communities to have access to. The e-Reader in general is a rather niche peripheral and I don’t expect many people to get value out of this, but if this tutorial can help even a few people down the line then it will have served its purpose.
If you’re still willing to follow the tutorial, please read every word of the guide carefully and make sure to follow the directions exactly. The e-Reader data format is over 20 years old and many of the tools in this tutorial are also rather ancient in internet standards. I tried to make it as painless as possible so if you’re going to try it for yourself, please follow the instructions carefully!
Requirements
- You will need a PC running Windows 10 or higher
- You will need Python 3
- You will need CaitSith2’s e-Reader development tools
- You will need access to these e-Reader decoder/encoder assist tools
- You will need BlackShark’s e-Reader header correcting tool
- You will need a hex editor, like HxD
- You will need access to e-Reader card data in
.rawformat
Tutorial
Download the source code from the latest release of the e-Reader decoder/encoder assist tools and extract it.
Enter the folder
/eReader-Compression/. This will be your root folder.Download and extract CaitSith2’s Dot Dode Dev Package to the root folder.
Your root folder should now contain several new files, but you can delete all the new files except
nedcenc.exe,nedclib.dll, andnevpk.exe. Alternatively, you can download these separately from CaitSith2’s site and put them in the root folder. Your directory should contain the following:
Place only ONE
.rawe-Reader card data in the /cards/raw/ folder. Doing multiple instances at a time may screw up the process.Run
raw-to-bin.batto automatically decode the.rawfile in said folder into.bin. These new.binfiles are placed in/cards/bin/.Run
bin_to_vpk.pyto automatically decode the.binfile into separate.headerand.vpkchunks. These files are placed in/cards/vpk/.You should now have two
.vpkfiles appended with -GBA and -GC, and one.headerfile. The -GBA file controls the letter that appears on the Game Boy Advance when scanned into the e-Reader bios. The -GC file controls most of the GameCube data in Animal Crossing; the actual letter and present that are sent.Open the
.headerfile in your hex editor and look at the final two bytes. These bytes represent the size of the -GBA.vpkin bytes. These two bytes are written in little endian, meaning if the final two bytes of the header read DB 05 then the actual value is0x05DBin hex. Refer to the diagram of a.headerfile below.
In this header, the VPK size is
0x05DBwhich equals 1499 in decimal. This means that the first 1499 bytes of the -GBA.vpkare the relevant pieces of data for scanning into the e-Reader. Any remaining bytes in the.vpkare used for headering the -GC.vpkdata.Make note of your VPK size info value in the
.headerand convert it to decimal following the example above.Open the -GBA
.vpkfile in your hex editor and navigate to the data that occurs after the relevant bytes dictated by the VPK size value. For example, if my VPK size value was 1499, I would navigate to the 1500th byte and start there.Select all the bytes from the end of your VPK size value to the end of the file and cut this data out of this file and paste it into a new file.
This data serves as a header for the -GC
.vpkdata, and the final two bytes of this data dictate the size of the -GC.vpk, similarly to the global.header. We will need to re-append this later so do not lose it.Save these changes to your -GBA
.vpk.Back in your root folder, run
vpk-to-dec.batto automatically decode the.vpkchunks into readable, decompressed files that you can modify with your hex editor. You should now have two files within your /cards/dec/ folder.If you wish to modify the data that appears on the GBA when swiping a card in the e-Reader bios, you can open the -GBA file in a hex editor and edit the data. However, for this tutorial, I will only be going over modifying the data that gets sent to Animal Crossing; that is, the -GC file.
Open the decompressed -GC file in your hex editor and refer to the following image to edit the text and item data within. Modifying this data will edit the letter and attached gift that is sent to your house after you use the e-Reader card at the Post Office.
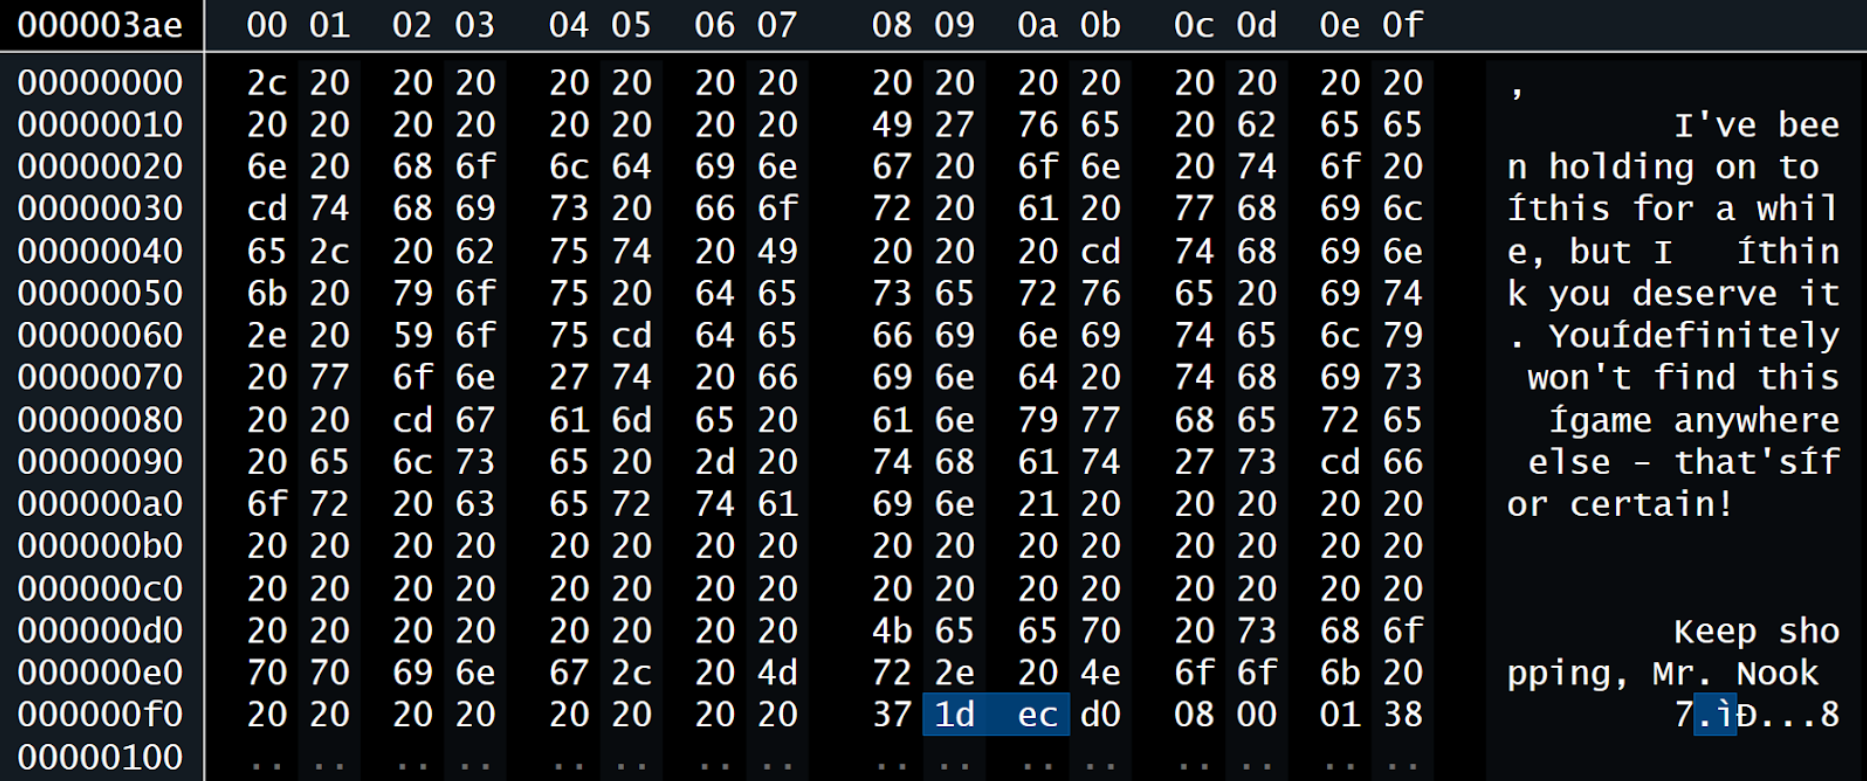
In this example, you can clearly see the letter text on the right. You may edit this to say anything you want as long you remain within the letter character limit. The bytes with hex values
0xCDrepresent a newline within the letter, which is useful for legibility. The bytes highlighted above, from offset0x00F9-x000FA, control what item is attached to the letter. This value is represented as an item code assigned to every item in Animal Crossing. To reference which codes correspond to which items, see this data megasheet. In the example above, the item is set to0x1DECwhich is equivalent to the Super Mario Bros NES item.Edit the file to your liking, just ensure you don’t include anything the game will not recognize, such as an invalid item code or invalid characters in the letter. Once complete, save the file.
Back in the root folder, run
dec-to-vpk.batto compress the decompiled files back to.vpk. These compressed.vpkfiles will overwrite the ones in your/cards/vpk/folder. If you do not wish for this to happen, rename your existing.vpkfiles before running the.bat.Open your -GBA
.vpkand your -GC.vpkin your hex editor. Make note of the size of both files in bytes.This has to be exactly correct later, so write it down! This is because re-compressing the files does not return them to their exact original size, resulting in some data flags being invalid in other places which we need to correct.
In your -GBA
.vpk, paste the bytes you cut previously in step 13 at the end of this file.The highlighted final two bytes of this data represent the size of the -GC
.vpkin hexadecimal. This is again written in little endian and must represent the size of the -GC.vpk.Replace the final two bytes in the -GBA
.vpkto represent the size of your -GC.vpkin hexadecimal and save the file.Next, open your original
.headerfile, which should also be located in/cards/vpk/. We will need to edit a few things here which can get complex, so pay close attention.Revisiting this header, the information we’re interested in modifying is the VPK size info flag in teal and the general size info flag in green. Modifying the VPK size info flag is as simple as replacing the final two bytes with the size of your -GBA
.vpkin hexadecimal. This is the same process as step 20, but for the -GBA.vpkthis time.Convert your -GBA
.vpksize in bytes into hexadecimal and edit the VPK Size Info byte values (last two bytes; in teal) to represent this new size in little endian.Modifying the general size flag in green is a lot more complex and requires some bit logic and explanation. Firstly, the size info flag is actually a 32-bit value read from right to left. In the above example, the hex value representing this value is 0x020BBA22.
Convert the Size Info Flag value (green) to binary.
In the example above, 0x020BBA22 converted to binary is
0000 0010 0000 1011 1011 1010 0010 0010.Here, bits 9-24 (in red) represent the original VPK size info flag value + 2 exactly. For example, the VPK size info flag in the above example is
0x05DB. Doing some math,0x05DB+ 2 =0x05DD, which when converted to binary yields0000 0101 1101 1101. You can see this value aligns perfectly with bits 9-24 in the general size flag:0000 0010 0000 1011 1011 1010 0010 0010 0 0000 1011 1011 101You now need to add 2 to your new VPK size you wrote in step 23 and convert this value into binary.
For example, if my VPK size is
0x05A8I would add 2 to get0x05AAand convert this value to binary to get0000 0101 1010 1010.Take this binary value and replace bits 9-24 in the general size flag with this new value. Example:
0000 0010 0000 1011 1011 1010 0010 0010
        0 0000 1011 0101 010
—--------------------------------------
0000 0010 0000 1011 0101 0100 0010 0010
Finally, convert this 32-bit binary back to hexadecimal and write the value back into the general size flag within the
.headerfile.Save your changes to the
.headerfile and close your hex editor. No files must be opened by any programs at this point.Back in the root folder, run
vpk-to-bin.pyto compress back to.bin. This will once again overwrite the.binfile in/cards/bin/.Open this new
.binfile in your hex editor. If your file is not exactly 2112 bytes, you will need to add padding in the form of00orFFat the end of the file until it is exactly that size. It should go up to offset 0840. Save the file once done.Extract BlackShark’s header correction tool to any folder you wish, and open the root folder so you can see headerfix.exe.
Drag your
.binfile from/cards/bin/directly over headerfix.exe to automatically fix any checksum flags present in the header. The card will not read properly without running it through this tool. This will overwrite your.binautomatically.If everything went smooth, run
bin-to-raw.batto convert back to.rawand you’re done! This.rawfile can now be used with Dolphin Emulator or be printed into a physical dot code to scan on a real console!If you wish to turn this
.rawfile into a printable dot code to scan on a physical e-Reader, see this video tutorial by Anzomia.
Troubleshooting
I would highly recommend testing on Dolphin Emulator before attempting to print the dot code physically.
If you run into a
READ ERRORon your emulated e-Reader, you likely made a mistake when setting the VPK or general size flag checks in the header data. Check that these are correct.If you run into a “this is not a character card” error, you likely made a mistake when re-appending the VPK data in step 20. Make sure your size bytes are correct!
If your card scans on the e-Reader BIOS but not in the Animal Crossing application, you have made a mistake editing the -GC data or your information in the re-appended VPK data in step 20 is incorrect.
If the
headerfix.exeprogram gives you a size error, your.binfile is not 2112 bytes in length. Be sure to append filler data to make the file the appropriate size.If the card reads successfully but crashes the Game Boy Advance, then your checksums are incorrect. Make sure you run your
.binfile throughheaderfix.exe!If your card works on emulator, but you’re getting a READ ERROR on your physical dot code/e-Reader, then there is a problem with your printed dot code. You may need to mess around with your printer settings to get a perfect print. 600x600dpi or higher printed on quality glossy photo paper is recommended.
If the card does not read at all then it’s impossible to know what went wrong – you will need to redo the entire process.
If none of the above is helpful, see the contact section below.
Contact
If you’re interested in this work or have further troubleshooting questions, you can contact me personally:
- Email hunterr.contact@gmail.com